
Calving Management
Dystocia Prevention and Intervention
Introduction
Dystocia is derived from a Greek word meaning difficult birth. In cattle operations dystocia is a major cause of calf loss with some studies reporting that 1/3 of calf losses are associated with dystocia. Besides the immediate loss resulting from a calf that dies at or shortly after birth there are other losses that can occur over time. Calves born from dystocia events take longer to stand and nurse, and will subsequently absorb lower amounts of immunoglobulins from colostrum. During a difficult birth, calves can be deprived of oxygen (hypoxemia) if the umbilical cord is constricted and the calf is unable to breathe because the chest is compressed. Posterior or backwards calves also are at risk for hypoxemia because the umbilical cord is constricted before the calf’s nasal passages are exteriorized. Hypoxemia can cause calves to be weak at birth and negatively impact the calf’s ability to stand and suckle. Because dystocia can decrease the calf’s ability for adequate passive transfer of immunoglobulins from colostrum, dystocia calves are also more likely to have subsequent health issues such as calf scours, navel ill or pneumonia.
Typically, heifers have more problems with dystocia than mature cows because the main cause of dystocia is maternal/fetal disproportion, meaning that the calf is larger than what the female is capable of easily delivering. Heifers are still growing and their pelvic canal has not reached its mature size. Therefore, heifers are not capable of delivering the same size calf as a cow. Small increases in calf size or weight can mean the difference between a natural easy birth and a difficult pull. Even without maternal/fetal disproportion, the birthing process is longer and slightly more difficult in heifers as the soft tissue in the perineal region does not relax as rapidly compared to older cows. Although cows do not have as many problems with dystocia as heifers, when they do have problems it can be serious because maternal/fetal disproportion is usually not the problem. Dystocia in cows is more commonly associated with malpositioned or deformed calves that may take careful extraction to salvage a positive outcome.
Females also are negatively impacted by dystocia. Severe dystocia can cause trauma to the cow or heifer during calving. In many cases trauma is limited to local soft tissue tearing but can also involve nerve paralysis or skeletal involvement. Additionally, dystocia females are more likely to have increased days open and reduced fertility.
When a difficult birth arises, timely and appropriate intervention can result in a positive outcome for the cow and the calf. Regular observation, an understanding of the normal stages of delivery and adequate facilities and equipment are necessary for intervention to be beneficial. The goals of dystocia intervention include an uninjured cow that is capable of taking care of her calf and getting rebred and a healthy viable calf that has the capability of becoming a productive individual.
Dystocia Prevention
The major cause of dystocia is maternal/fetal disproportion; thus, prevention is focused on bull selection and heifer development. Malposition of the calf is not predictable and there are not any methods to prevent malposition ahead of time. Occasionally, genetic defects can lead to malformations that may cause dystocia. Careful selection of matings can minimize the chance of genetic defects appearing in your herd.
Bull Selection
Sires selected for use in yearling heifers are usually different than sires used in the mature cow herd. Breed associations publish expected progeny differences (EPDs) that can be used to select a sire that has a decreased chance of causing dystocia. There are several traits people use to select for reduced dystocia. Birth weight is a highly heritable trait that was historically used to select for reduced dystocia. The downside of selecting for light birth weight is that growth traits are typically related, so selecting for lighter birth weight in many instances also selects for lighter weaning and yearling weight which may impact long term profitability. Moreover, year-after-year selection for low birth weight will likely reduce the individual animal size and pelvic size of the cow herd over time. Thus, selection solely for low birth weight can have negative long term effects on dystocia in herds where replacements heifers are developed from within. Calving ease direct is another EPD that can be used and is not solely associated with birth weight. In contrast to selecting only for birth weight EPD’s, calving ease direct reflects the estimated percentage of unassisted births that the bull will have when mated with heifers. Calving ease direct accounts for not only birth weight (about 60% influence) of the calf but shape and other intangible aspects and is not negatively associated with the other growth traits. Thus, a bull with high calving ease direct does not necessarily have lower weaning and yearling weights.
Heifer Development
Heifers are targeted to give birth for the first time at 24 months of age. Heifers that have been developed and managed properly will be about 85% of their mature cow size at calving time. Heifers that are under-developed may only be 70%-80% of their mature size at calving, thereby vastly increasing the potential for dystocia. A misconception of some beef producers is that restricting nutritional intake of a female can reduce dystocia by decreasing calf birth weight. However, research has demonstrated that although the calf may weigh less at birth the risk of dystocia is increased because of decreased pelvic size as growth of the heifer is restricted and thin heifers do not have the strength and stamina to complete the birthing process.
Maternal calving ease EPDs can be used to select for females that can improve calving ease in the herd. Additionally, many producers will use pelvic measurements prior to breeding to select heifers that have an acceptable size pelvis relative to the mature cow size of the herd.
Dystocia Intervention
Assessing the Cow and Calf
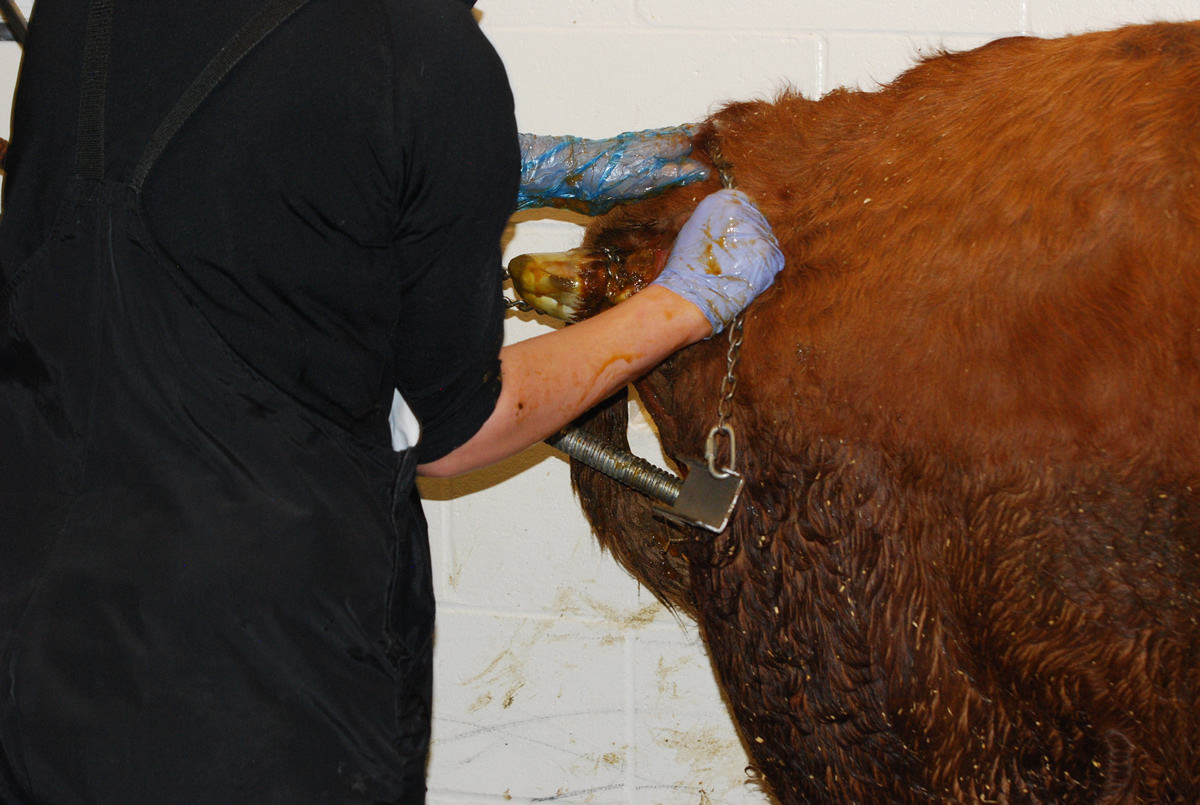
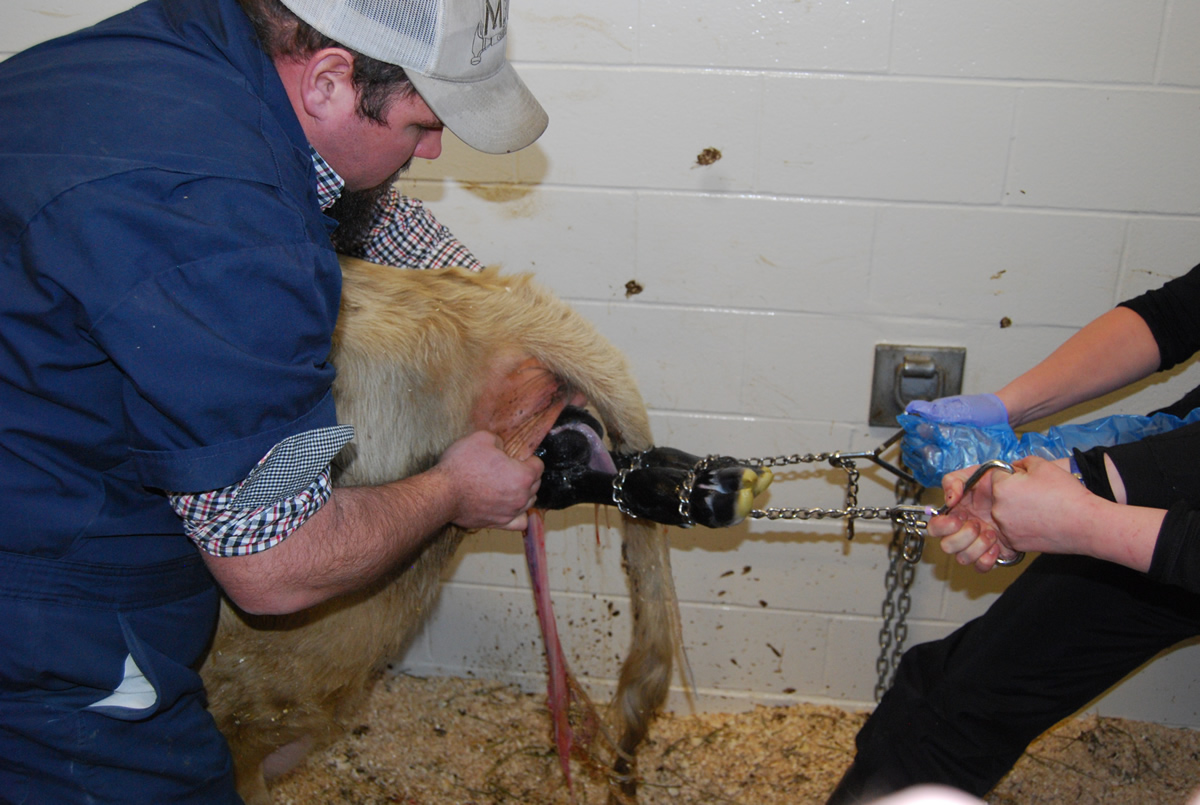
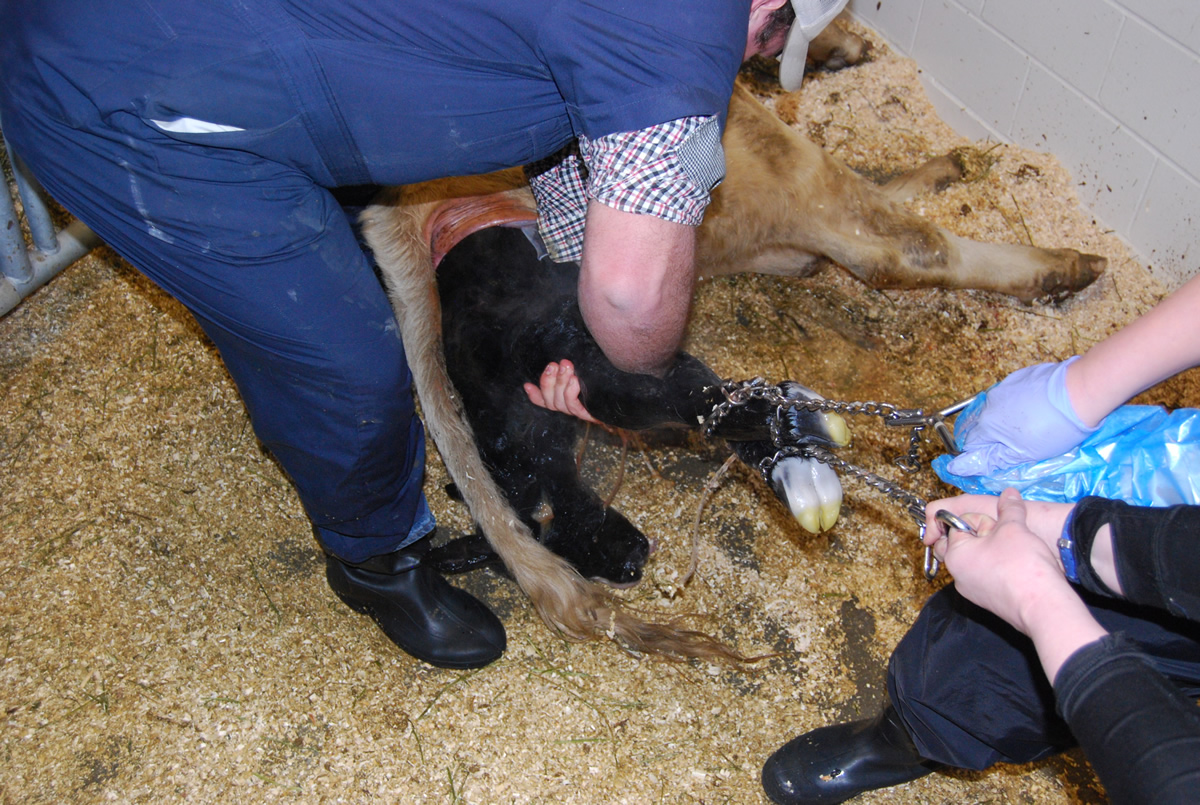
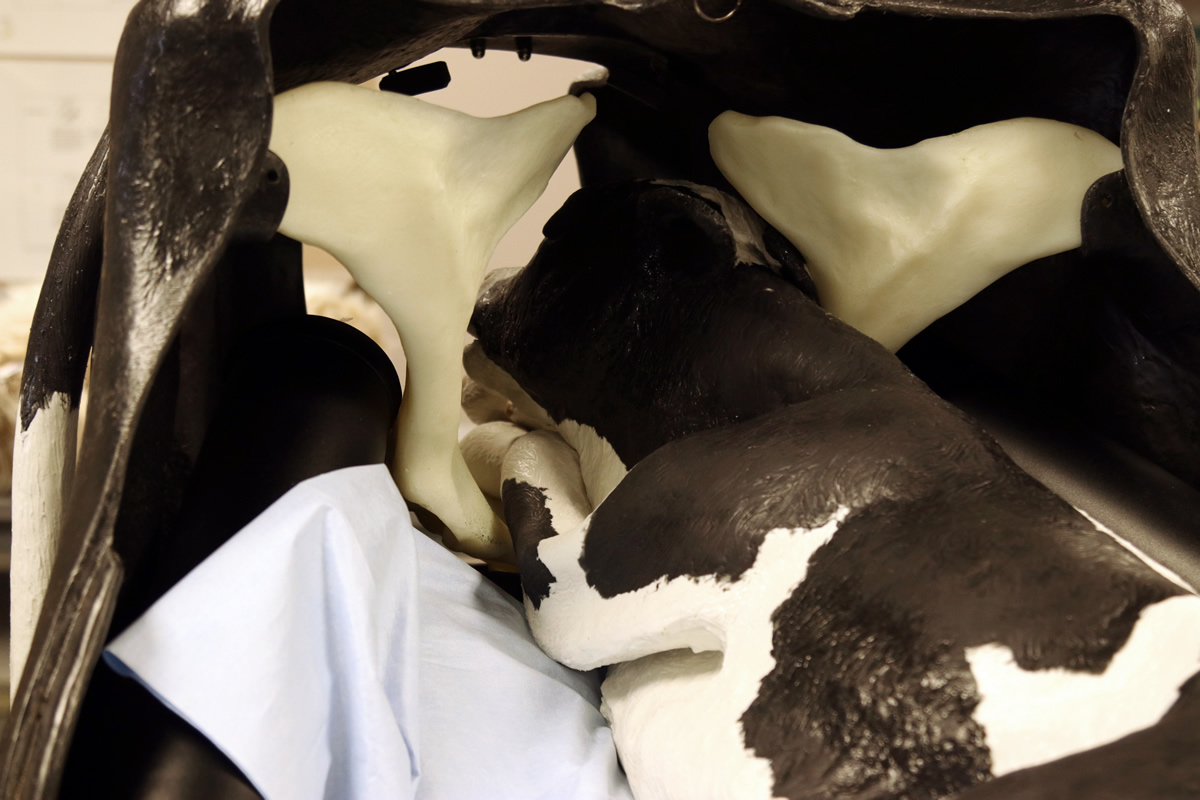
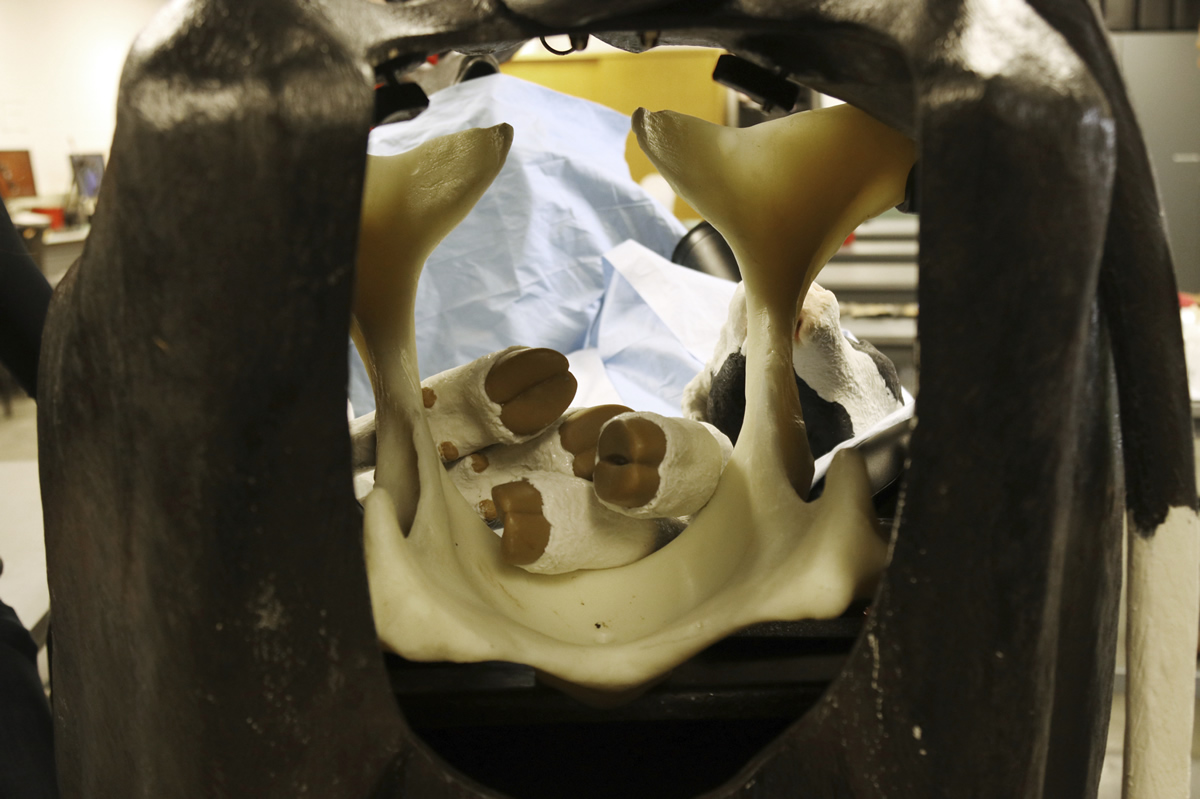
Meconium staining
Meconium staining is present on the
calf's feet and person's hands.This
yellowish-brown tinged fluid indicates
the calf is stressed.
Image credit: Grant Dewell
You can never assist a cow too early in a dystocia event once stage 2 labor has started, but assisting too late can result in a dead or poor-doing calf. Prior to assessing the cow make sure that you and the perineal area (area under her tail) are clean to prevent contaminating the uterus. Ivory soap can be used to clean the cow’s vulva area if needed. OB sleeves should be used to protect the cow and yourself. Utilize plenty of obstetrical lubricant to ease the exam and prevent trauma. If you intervene too early and the cow or heifer has not dilated appropriately yet, use some patience and manually dilate the cervix and vagina by applying firm steady pressure with your hands and arms inserted into the birth canal. Make sure the cervix and vagina have dilated appropriately before you try pulling the calf, or you can cause some tearing of the tissue.
This also is a good time to check the viability of the calf. Calves that are vigorous will jerk their foot away if you grab it or pinch it. Calves may also suck on your finger if you can reach their mouth. If you can reach the calf’s thorax you should be able to feel the calf’s heartbeat. Backwards or breech calves can be assessed by checking feet (can pinch between the toes to see if they react) or checking to see if the anal sphincter has any tone to it (you can do this by placing a finger in the rectum to see if they have tone). Generally if you don’t get any reaction then the calf may be dead. However, some calves will not give a reaction even though they are still alive so don’t give up right away. Some calves that are moving excessively may be in distress and end up as a stillborn calf instead of just being a lively calf. Calves that have been dead for 12 hours or more will start to have a decomposing odor to them. With dead calves, you may also notice them slipping or shedding hair when you palpate them. Another way to assess stress of the calf is to check for meconium staining. Meconium is the fecal material the calf is born with. Calves that become stressed will defecate in utero causing the amniotic fluid to have a yellowish to greenish color and white hair of the calf will turn yellow.
The first step in assessing a dystocia is determining the presentation, position and posture of the calf. Presentation refers to which part of the calf is being presented for delivery. A normal presentation is an anterior (forward) presentation with the front legs and head coming out first. A posterior presentation, or backwards presentation, is a frequently seen type of dystocia. Occasionally, a transverse presentation is seen where the calf is lying on its side across the cow’s abdomen with all four legs (or the back) being presented for delivery. Calves can be pulled in either an anterior or posterior presentation. Transverse presentations need to be manipulated so that the calf is either coming anterior or posterior.
Position refers to the calf’s position relative to the cow. An upright calf is positioned with its vertebrae aligned with or pointed towards the cow’s vertebrae (right side up) which is the normal birthing position. An upside-down calf is positioned with its vertebra pointed towards the cow’s abdominal wall. An upside-down calf must be corrected by flipping over to right side up prior to pulling through the birth canal. Calves should be pulled in an arc through the cow’s pelvis towards the ground or the cow’s legs. Pulling an upside down calf could cause severe damage to calf’s back bone as it is arced through the pelvis and this should be avoided. Occasionally, a calf will be in a lateral position with its vertebrae pointing towards the cow’s side. These calves can be easily turned 90 degrees to an upright position.
Posture describes the position of the individual parts (head and limbs) of the calf in relation to its body. A normal posture is for both front legs and the head to be presented in the birth canal. Postures such as a leg or head back would be an abnormal posture. Abnormal posture needs to be corrected prior to pulling the calf so that both front legs and the head are being delivered first for an anterior presentation or both back legs and the tail for a posterior presentation.
If you cannot manipulate the calf into a correct posture and position for the presentation fairly quickly (typically 15 minutes or less), then professional assistance should be obtained. Delays in correcting the position or posture can further stress the calf and cow, potentially leading to an unsatisfactory outcome such as a dead or injured calf and/or cow. Just as early assistance is helpful, an early decision to seek veterinary assistance may be helpful and can prevent both calf and cow death loss. Abnormal calf postures and positions that cannot be corrected in 15 minutes need professional assistance and in many cases will necessitate a caesarian section. Besides time, any evidence of stress on the calf (swollen tongue, meconium staining of the calf, or presence of yellow-tinted amniotic fluid) is an indication to seek professional assistance.
Pulling the Calf
Before you start pulling the calf, (video) the first step is to determine if the calf can likely be pulled or if a caesarian section is the better option. It is best to make this determination early on in the process. Once the calf is about 1/3 of the way out, it is difficult to stop and switch to a cesarean section. If the calf is obviously too large then it is an easy decision to make. The harder decision is determining if a large calf that seems just a few pounds too large to be birthed naturally should be pulled or if a C-section would be the best method. A good rule of thumb is that if you can easily pull both of the calf’s fetlocks a hand’s breadth (about 4 inches) outside of the vulva and the calf’s head is completely in the pelvic canal then the calf can usually be pulled. At this stage the calf shoulders should be entering the birth canal, indicating that the rest of the calf should follow reasonably well. Remember the calf’s hips are bigger than the shoulders so if you had to pull hard just to get the shoulders in the birth canal the hips will be even more difficult. For a backwards calf, exteriorization of the calf’s hocks would indicate that the calf’s hips are in the pelvic canal and the rest of the calf should likely follow. Another important indicator is the position of the calf’s front legs. When shoulders of a large calf enter the birth canal, the pressure on the legs and joints can cause the front legs to be crossed. This is not a perfect indicator but does suggest that the difficulty of the pull may be hard and a C-section may be necessary, particularly if the legs are crossed and they cannot be exteriorized at least four inches from the vulva with the head in the pelvic canal. Remember to assess the level of stress the calf is under. If the uterine fluid is yellow-tinged, the calf’s tongue is swollen, or the calf is meconium-stained, that means the calf is stressed and time is of the essence.
Pulling the calf
Pull in a downward arc towards the
cow's hocks or the ground.
Image credit: Andrew Kingsbury
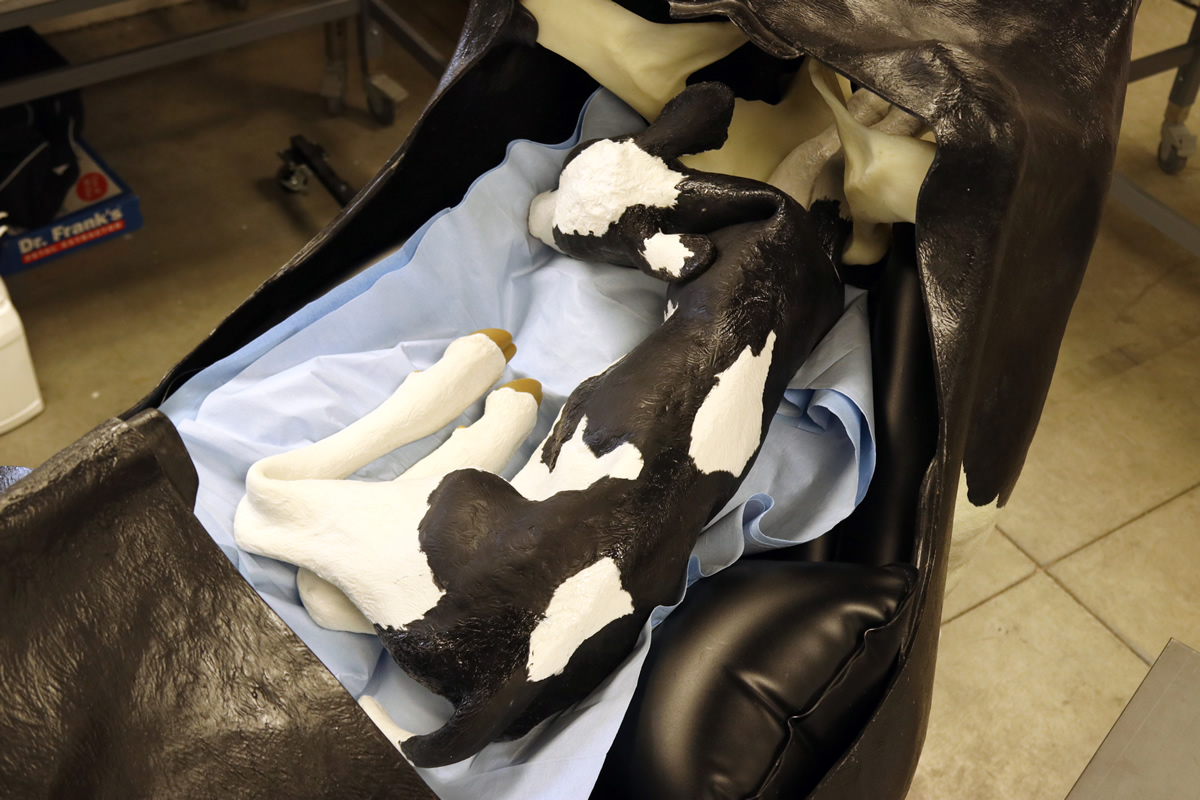
Pulling the calf
A normal presentation, posture, and
position include the calf being
presented
right-side up with the
forelegs and head coming through
the pelvic canal first.
Image credit: Andrew Kingsbury
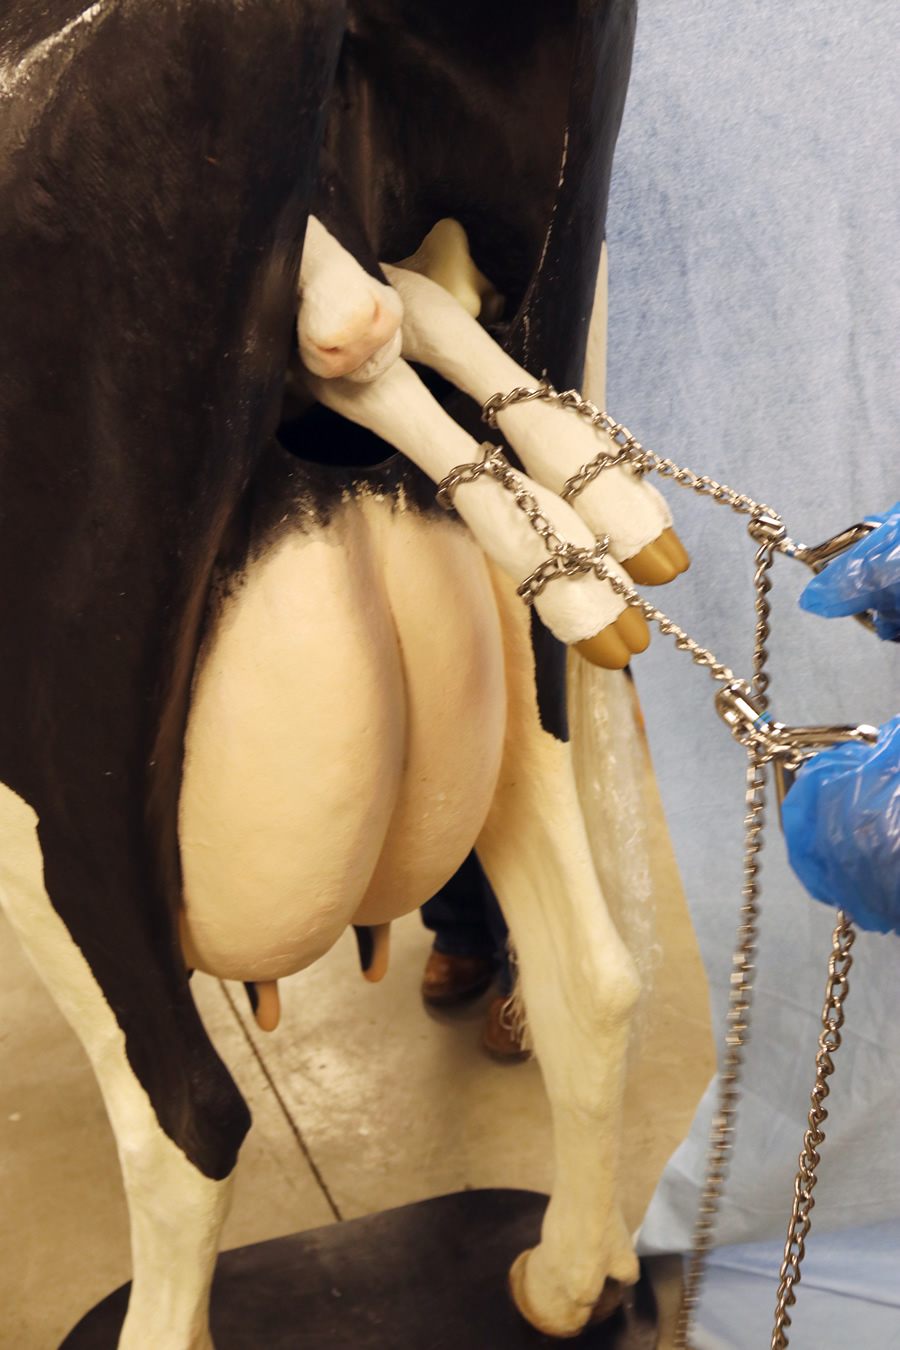
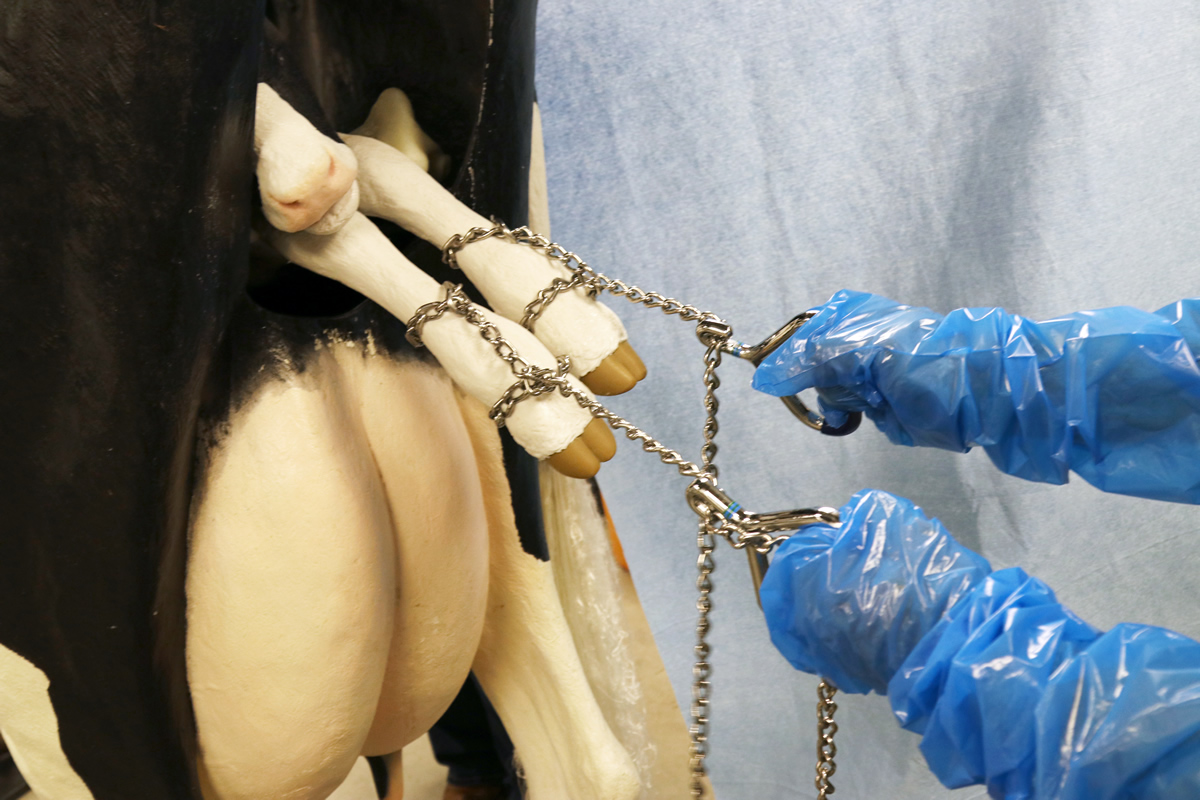
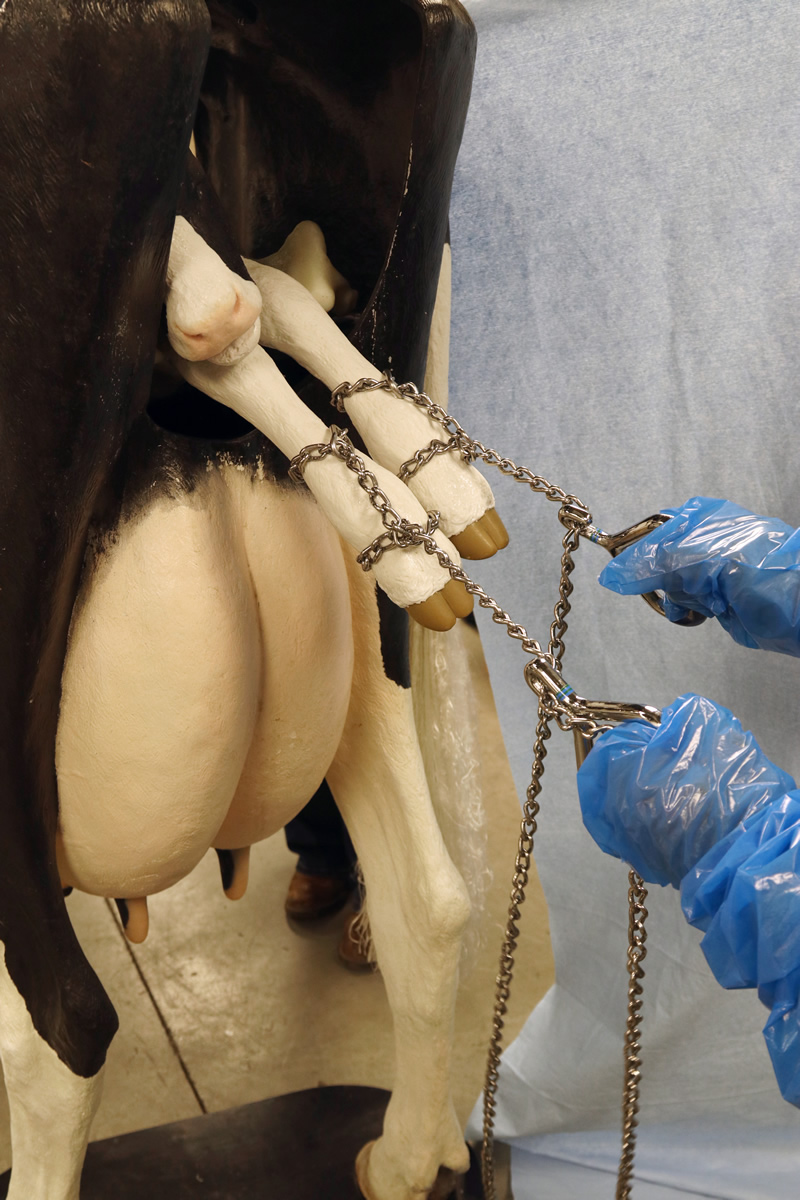
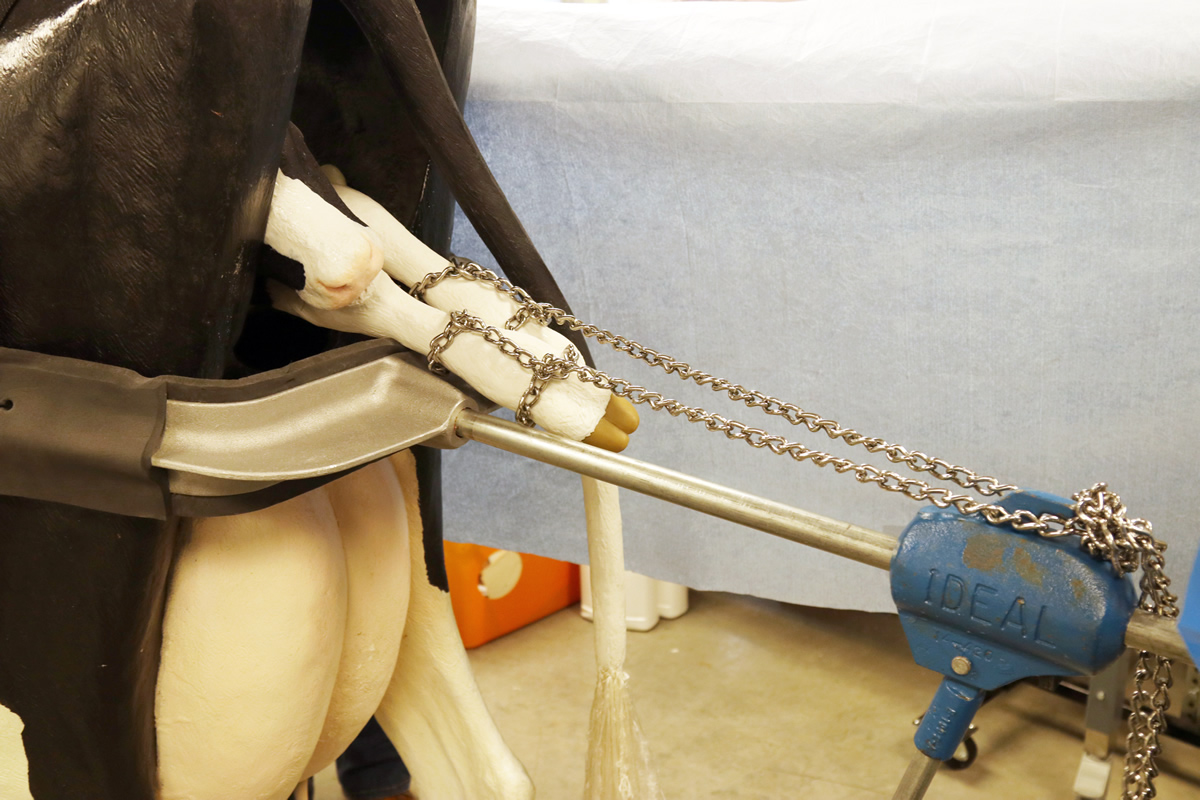
As you prepare to pull the calf, be careful when applying chains or straps so that you do not injure the calf when you are pulling. A long 60-inch chain and 2 short 30-inch chains will allow you to accomplish most manipulations and extractions. Pulling straps may be used instead of chains. Compared to chains, straps are often wider and have a larger surface area for the pressure to be applied. But they can be harder to clean and disinfect compared to chains, may not be as adaptable as chains, and may not last as long as chains. Ideally, the chains or straps should be applied with first loop above the fetlock and then a half hitch just above the hoof. This will spread the pressure applied to the calf’s leg by the force on the chain over a wider area, greatly decreasing the likelihood that the calf’s legs will be damaged by pulling.
Avoid attaching straps or chains to the calf’s legs with only one loop. A single loop above the fetlock joint applies all the pressure on the growth plate of the cannon bone (the long bone just above the fetlock) and can either crush the growth plate or separate (break) it. If a single loop is used above the hoof then the coronary band can be damaged (causing problems with hoof growth later on) or the hoof wall may be pulled off. An exception to using a single loop to pull is when you are using the strap or chain to help correct a malpresentation such as pulling a retained leg up into the pelvic canal. In these cases, when the strap or chain is being used to manipulate a leg and not to pull the calf from the birth canal, it is fine to use a single loop.
Pulling the calf
Apply the chains with the first loop
above the fetlock and then a half
hitchabove the hoof. Regardless of
whether the cow is standing or
lying down, it is important to pull in
an arc towards the cow's hocks.
Image credit: Andrew Kingsbury
Keep in mind that the object is not to pull the calf as fast as you can, but to provide assistance to the cow as she labors to deliver the calf. During the normal birthing process, a cow will lie down and standup repeatedly. When assisting with a calving, be prepared to move with the cow and avoid keeping her in a set position. One purpose of allowing the cow to move around is to shift how the calf and uterus is positioned in the abdomen to allow for easier delivery. In addition to allowing the cow to move around during delivery whenever possible, it is also important to pull the calf only when the cow pushes and then relax when she does. When you provide hard steady traction throughout the process, you don’t allow the cow or the calf to rest. Pulling on the calf will stimulate the cow to push but she needs time for her muscles to relax and to catch her breath in between efforts. As long as the cow is not exhausted, she will be able to provide a significant portion of the force needed to expel the calf. Additionally, the calf needs a break, too. Constant pulling on the calf may prevent good circulation of blood. Once the calf’s thorax is exposed but the hips are still inside, many calves will try to breathe. If there is constant traction on the calf they may not be able to properly expand their chest to breath. Once the thorax is exposed but the hips are still in the birth canal, the umbilical cord is often pinched in the pelvis and cannot provide oxygen from circulating blood. Thus, calves that are not provided breaks to breathe may die from asphyxiation.
During hard pulls, it is particularly advisable to stop and rest at least 30 seconds at each interval to allow the cow and calf to recover. The first stopping interval should occur once the calf is situated normally in the pelvic canal just prior to the nose becoming visible. Allow at least 30 seconds for the calf to rest before resuming pulling. Prior to resuming pulling, make sure the vulva is completely relaxed and the vaginal vault is dilated before beginning to pull again. If there is sufficient room in the pelvis for the calf to be born but the vulva is not relaxed and/or the vaginal vault has not dilated, it can be manually dilated. Vulva and vaginal vault dilation can be stimulated by inserting both hands and/or arms into the vaginal vault along both sides of the calf, then pushing your hands/elbows out against the vaginal wall.
The second resting interval during hard pulls should occur when the calf’s head is completely out of the vulva. Providing a resting period at this point allows circulation to the calf’s brain to resume properly and may prevent the calf from becoming unconscious due to lack of oxygen. The third resting interval should occur after the shoulders have become exposed. At this point, the umbilical cord will begin to be pinched off and the calf needs a chance to begin to breathe. At this stage the calf’s hips are approaching the dam’s pelvis which is normally the most difficult passage. As you start the next pulling phase it can be very beneficial to rotate the calf 90° to allow the calf’s hips to better fit in the pelvic canal. This rotation can be accomplished by crossing the calf’s front legs as you pull. Once the calf’s hips have traversed the birth canal, the calf is essentially delivered.
Avoid this
Avoid placing the chain only above the fetlock (left) or hooves (right) as it
can injure the joint.
Image credit: Andrew Kingsbury
Using a Calf Puller
A mechanical calf puller or calf jack can be used to assist in pulling a calf if you are by yourself and need additional assistance for a moderate pull; or, in some cases, may be used for a very difficult pull. If used inappropriately, a mechanical calf pull can lead to a dead calf and/or an injured or crippled cow. In some cases, a calf puller may be able to forcibly extract the calf but the outcome would have been better if a cesarean section had been initiated instead. It has been determined that the maximum force to apply when pulling a calf is that of two strong men pulling by hand or about 500 lbs of force. However, a calf puller can apply several 1000 lbs of direct force and when used as a fulcrum that force is further multiplied.
Avoid this
Avoid pulling the calf in a horizontal
direction.
Image credit: Andrew Kingsbury
Do this
Pull in a downward arc towards the
cow's hocks or the ground.
Image credit: Andrew Kingsbury
Do not begin to use the mechanical calf puller until the calf is in the proper presentation for delivery. Using a calf puller is similar to pulling by hand in that you do not want to pull at full force continuously. It’s important to use the calf puller to apply some additional force when the cow strains and then rest when she relaxes. Due to the amount of force applied by a calf puller, it is important that chains are applied with a loop above the fetlock and a second hitch below the fetlock as explained in the pulling the calf section. Since the force the calf puller applies is so high, make sure the cow’s cervix and vaginal vault is fully dilated and you are using plenty of lubrication to minimize damage to the cow. If you are not able to move the calf or other problems arise stop pulling and reassess the situation.
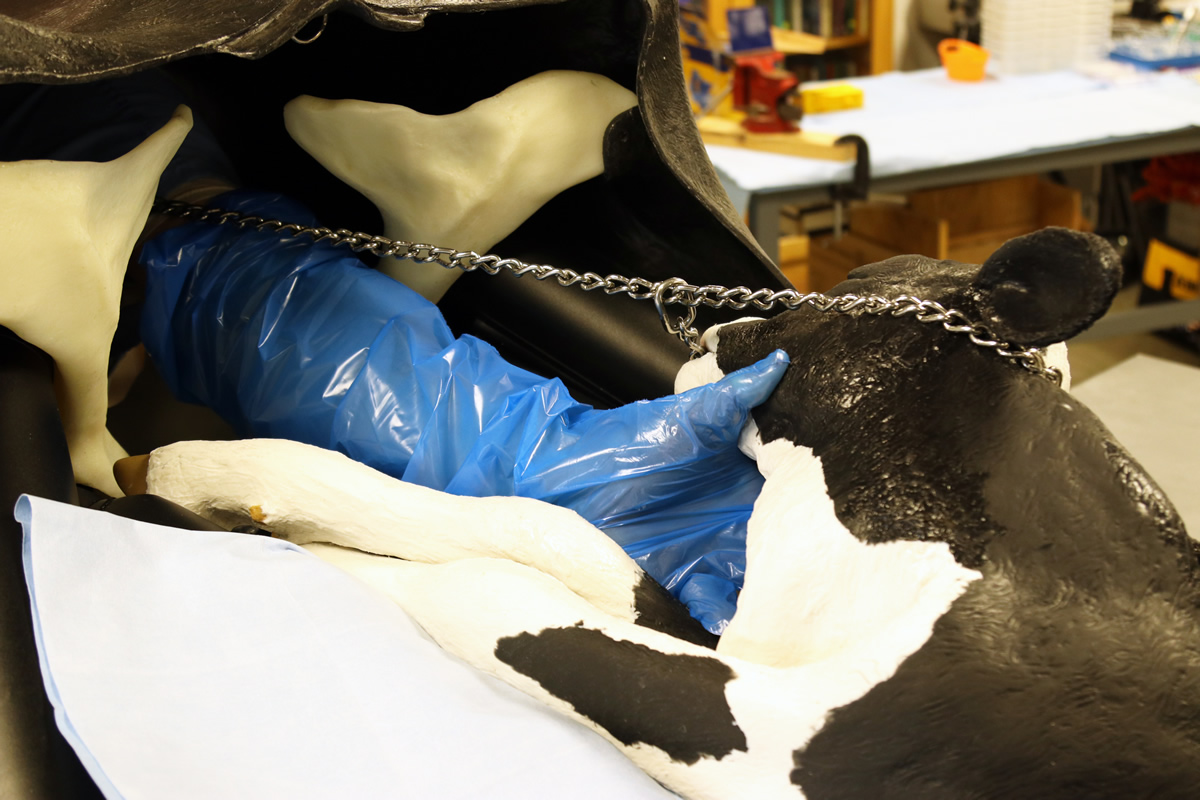
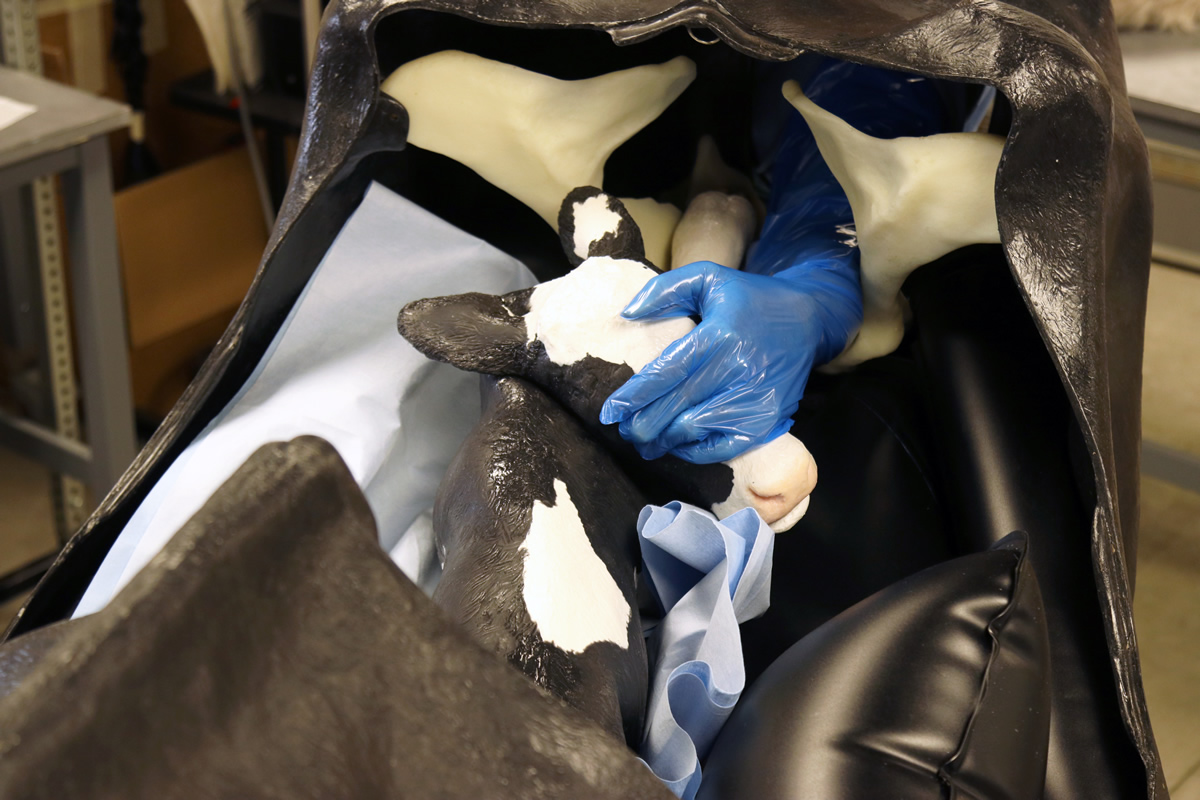
Vulva and vaginal vault dilation
Vulva and vaginal vault dilation can
be stimulated by inserting both
hands and/or arms into the vaginal
vault along both sides of the calf,
then pushing your hands/elbows out
against the vaginal wall.
Image credit: Grant Dewell
Once the chains are properly placed on the calf, place the calf puller strap over the top of the cow’s hips and base plate of the calf puller just below the cow’s vulva. Next, hook the calf chains to the puller. Once everything is set, take up any slack between the calf and the puller. While doing this, get a sense of the cow’s labor rhythm and be ready to apply pressure as needed when she pushes. There are two methods that can be used in assisting the cow when using a mechanical puller. One method keeps the calf puller is the same position perpendicular to cow’s hind end; when the cow pushes, the operator applies additional force by operating the ratchet mechanism of the puller. When the cow relaxes the operator stops ratcheting and holds the calf where it is. This can be successfully used- but in a hard pull the calf is always under constant force and may not be able to breathe properly. Just as a calf can’t breathe when its chest is compressed by the birth canal, it also can’t breathe properly if its legs are being stretched and its chest compressed and stretched. In these situations, you may need to stop occasionally and release the tension on the calf puller to allow the calf a chance to recover. This method works well for calf pullers that are designed with the rod having ratchet grooves in it and the mechanism walks the calf out by applying pressure on one leg at time.
Rotation
Once the front legs and thorax are
delivered, it can be very helpful to
manually rotate the calf 90° to allow
the calf's hips to better fit in the
pelvic canal.
Image credit: Andrew Kingsbury
Another pulling method when using a mechanical calf puller is to use the calf puller as a lever and the base plate (the metal part that goes under the cow’s vulva) as the fulcrum. When using this method, the pressure is just slightly relaxed when the cow is resting and the calf puller is held perpendicular to the cow’s hind end. When the cow begins to strain, the end of the calf puller is rotated towards the cow’s feet so that the calf is pulled in a downward arc. This can multiply the force so operators need to be careful of how much force they are applying. When the cow rests, the calf puller is returned to a perpendicular position and slack is taken up to allow both the dam and the calf to rest. This can let the calf recover and breathe a little as long as you don’t start stretch the calf back out. The arc method is believed to assist in pulling because it also mimics the arc the calf travels from the bottom of the cow’s abdomen and through the birth canal. Calf pullers that are designed with cable and come-a-long mechanism work well for this method. However, care must be taken as come-a-longs can apply excessive force by themselves without multiplying with a fulcrum. Ratcheted rod pullers can also be used in this manner but the rod may bend if you are not careful.
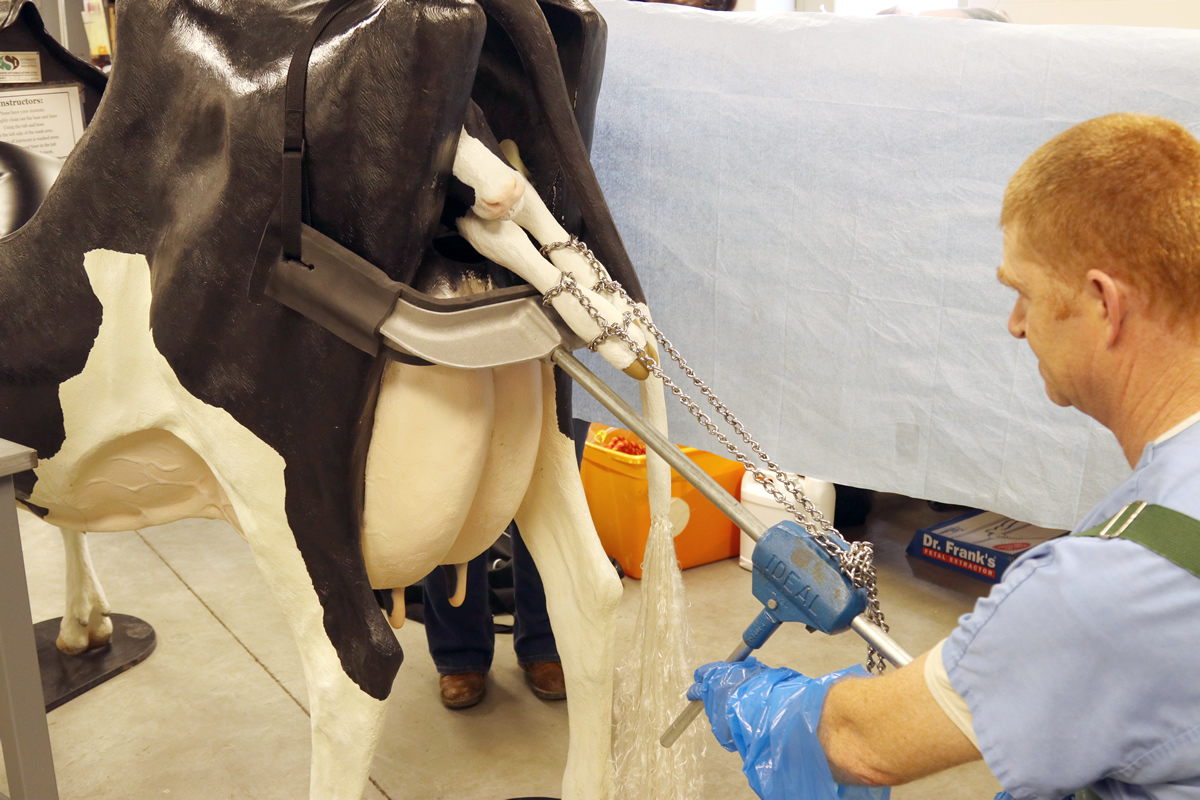
Positioning of calf puller
When the cow begins to strain, the end of the calf puller is rotated towards
the cow's feet so that the calf is pulled in a downward arc (right picture).
When the cow rests, the calf puller is returned to a perpendicular position
and slack is taken up to allow both the dam and the calf to rest (left
picture).
Image credit: Andrew Kingsbury
With either method, it can be advantageous to rotate the calf 90° as the hips come into the birthing canal as described in the pulling the calf section. Pay careful attention to the calf and provide rest breaks for the calf during the pulling process. Pulling a calf is not a race and you should make it a point to consider the health of the calf throughout the process. If progress is not easy, seek professional help quickly. However, remember that once you start pulling with a calf puller there is probably no going back and trying a cesarean section. A calf puller is going to very rapidly pull the calf past where it is possible to get it back in the uterus. A calf that gets hung up in the birth canal when using a calf puller will probably need to be euthanized and then a fetotomy performed to remove the calf in pieces.
When to Call for Help
When providing calving assistance it is important that a difficult situation is not made worse. The goals of a cow-calf producer are to have calves to sell at the end of the year and a pregnant cow. Hard pulls when trying to assist the birthing process can put both of those goals in jeopardy. Some cattle producers may be concerned that the cost for veterinary assistance may not be worth it. However, a dead calf has zero value and if a young heifer does not breed back the cost to the operation far eclipses veterinary expenses for calving assistance. For veterinary assistance to have a chance to be beneficial the veterinarian needs to be called early enough in the process to be able to deliver a healthy calf and maintain the health of the mother. If the veterinarian isn’t called until the calf is already stressed or the cow injured then there is little opportunity for a positive outcome.
Knowing when to call a veterinarian is key to having a viable calf and cow following a difficult calving. When dealing with large calves, the decision to pull the calf or elect for a cesarean section should be done with careful consideration early on. The difficulty is that the calf’s hips are the most likely anatomical part to become hung up during the pulling process. However, the calf will be 2/3 to 3/4 delivered when the calf’s hips enter the birth canal. At that point it is impossible to decide that the calf is too large to be delivered through the birth canal and then try a push it back into the uterus and perform a c-section. If the calf does become hip-locked the odds that the calf will be die and cow be injured goes up substantially. The guidelines described in the pulling the calf section regarding easily exteriorizing both fetlocks a handbreath while the calf’s head is in the birth canal is the first step to determining if the calf should be pulled or a c-section considered instead. Anytime your ability to pull the calf abruptly becomes more difficult, you need to reassess if the calf can be pulled instead of just trying to pull through the difficulty. Once you begin pulling, routinely check for room in birth canal. One rule of thumb is that if you cannot get your hand between the calf and pelvic canal, then there is no more room left for the calf and a c-section may be necessary. If pulling is difficult but there is room in the pelvic canal then the problem could be that soft tissue around the vulva needs to relax more which can be facilitated by stretching the vulva manually and using plenty of lubrication. If the vulva is relaxed and there is room in the pelvis but pulling is difficult, then that may indicate a malformation or other problem that will require veterinary assistance.
If the size of the calf is not the problem but some form of malpresentation is causing the dystocia, then the art of calf delivery comes into play. Many malpresentations can be easily corrected and delivery accomplished swiftly. However, if you are not comfortable with the situation or are unfamiliar with how to correct the malpresentation then veterinary assistance should be sought quickly. Another important rule of thumb to use is if you have been working for 15-30 minutes and have not corrected the malpresentation and/or are not making significant progress in delivering the calf, then veterinary assistance should be pursued.
Common Dystocia Problems
When trying to correct an abnormal presentation, position, or posture it is important to work carefully and quickly, and use sufficient lubrication. During prolonged dystocias, most of the amniotic fluid that normally provides sufficient lubrication has already been expelled and the uterus will have contracted down around the fetus making repulsion and manipulation difficult. Without additional lubrication the uterus can be torn during the process which can lead to death from peritonitis. If you have identified a malposition early on in the birthing process there will still be fluid in the uterus and room to manipulate.
If you are able to successfully correct a dystocia and are ready to pull, be sure to check whether the calf is likely to be successfully pulled. Recall that a good rule of thumb is that if you can easily pull both of the calf’s fetlocks a hand’s breadth (about 4 inches) outside of the vulva and the calf’s head is completely in the pelvic canal, then the calf can usually be pulled. Remember to seek veterinary assistance if you do not know how to correct the problem, cannot correct the problem, or it is taking you longer than 30 minutes to correct the problem.
Elbow Lock
Elbow lock
An elbow lock occurs when the
forearm or elbow is locked against
the brim of the pelvis and the
presence of the shoulders in the
pelvic opening prevents the leg from
being advanced.
Image credit: Andrew Kingsbury
An elbow lock of one or both front limbs is fairly common and easily corrected. The problem is identified by the foot being back by the calf’s nose instead of the fetlock extended out past the calf’s nose. In some circumstances, traction alone on the leg can correct the problem. However, a true elbow lock has the forearm or elbow locked against the brim of the pelvis and the presence of the shoulders in the pelvic opening prevents the leg from being advanced. In order to correct an elbow lock, repulse (push back) the calf back into the birth canal by pushing on the shoulders or head while applying traction on the limb until the elbow can clear the brim of the pelvis and be fully extended. Once both front feet are presented, be sure to assess the likelihood that you can continue to pull the calf out.
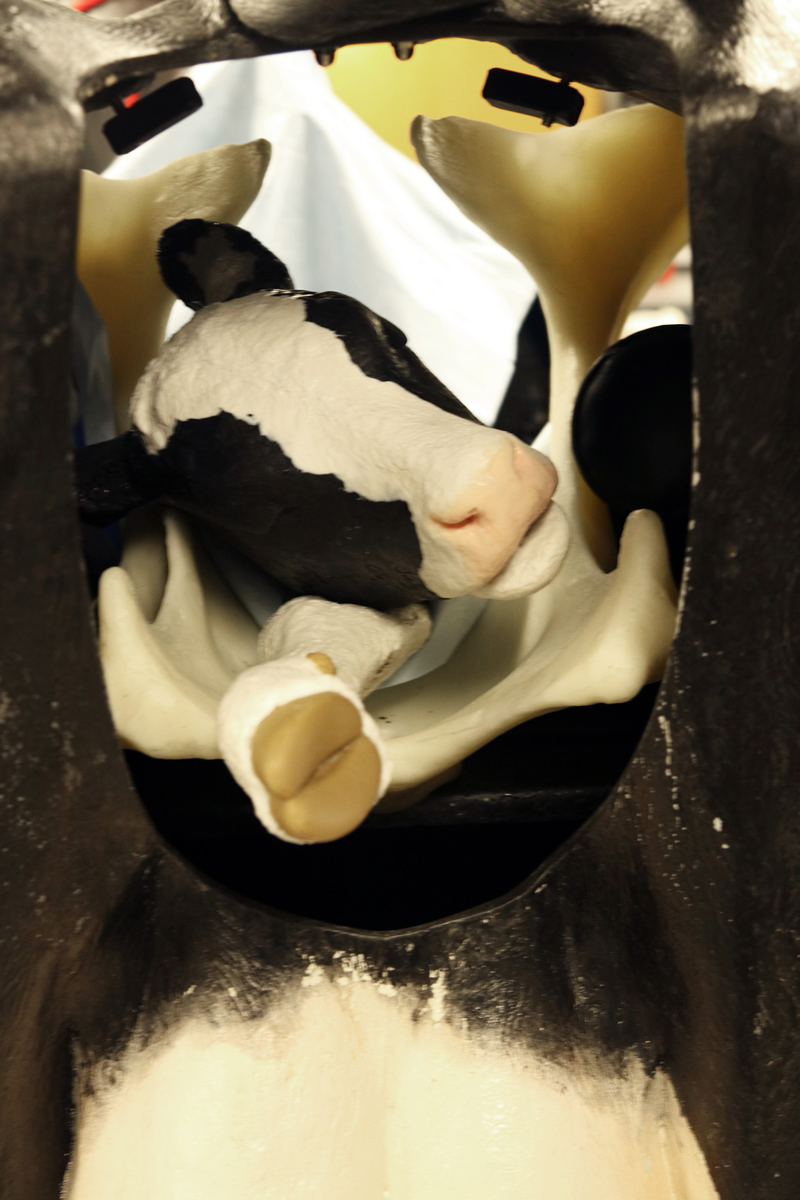
Lateral Deviation of the Head
Lateral deviation
Lateral (sideways) deviation of the
head.
Image credit: Andrew Kingsbury
Another common cause of dystocia is a lateral (sideways) deviation of the head. Some may mistake this for a backward calf initially since the head cannot be easily felt. However, both front legs should be presented normally but the calf’s head is turned back along its chest. This malposition can be corrected as long as there is enough room in the uterus to bend the head back around to face the birth canal. Before spending a lot of time and effort correcting this malposition, try to estimate if the calf can really be delivered vaginally or if a C-section is necessary. One reason for the calf’s head to be deviated to the side is that there was not enough room in the pelvis for both legs and the calf’s head. During labor the calf’s head may eventually go to the side if it won’t fit in the pelvis. If the calf’s feet are big (indicating large calf size), or the legs cannot be easily pulled a hand’s breadth from the vulva, or the cow’s pelvis is small, then correction of malposition may not allow for vaginal delivery. Additionally, make sure the calf is alive since live calves will often try to keep their head positioned on top of legs during calving.
Lateral deviation
Place the loop of the chain
or strap around the calf's poll and
then through the calf's mouth with
the standing end of the rope or
chain down at the calf's mouth.
Once the loop is in position around
the calf's head, repulse the calf by
pushing on the calf’s chest while
applying traction to pull the head
around muzzle,
then try grasping
the top of the head to pull it around.
Image credit: Andrew Kingsbury
Lateral deviation
When correcting a lateral head
deviation, if you cannot get under
the head to grasp the chin or
muzzle,
then try grasping the top of
the head to pull it around.
Image credit: Andrew Kingsbury
Lateral deviation
To correct a lateral head deviation,
come under the calf's jaw with your
hand and raise the head slightly
while turning the head.
Image credit: Andrew Kingsbury
If it appears that calf will fit through the pelvis then the abnormal posture can be corrected and the calf pulled out. You may need to repulse (push back) the calf in order to reach the calf’s head. Ideally if you can come under the calf’s jaw with your hand, you can raise the head slightly while turning the head. Grasp either the calf’s jaw or muzzle and gently swing the calf’s head around so that it presents in the birth canal. In some cases, it may work better to grasp the top of the calf’s head/muzzle.
If the cow is straining you may not be able to repulse the calf and swing the head with your hands. In these circumstances a rope, chain or snare can be used. Place the loop of the chain or strap around the calf’s poll and then through the calf’s mouth with the standing end of rope or chain down Image 4913 at the calf’s mouth. Once the loop is in position around the calf’s head, repulse the calf by pushing on the calf’s chest while applying traction to pull head around. Some sources state that you can put a loop just around the calf’s lower jaw but caution should be exercised when using this method as it can easily result in a broken jaw. Also, this method can expose the calf’s teeth which could tear the uterus.
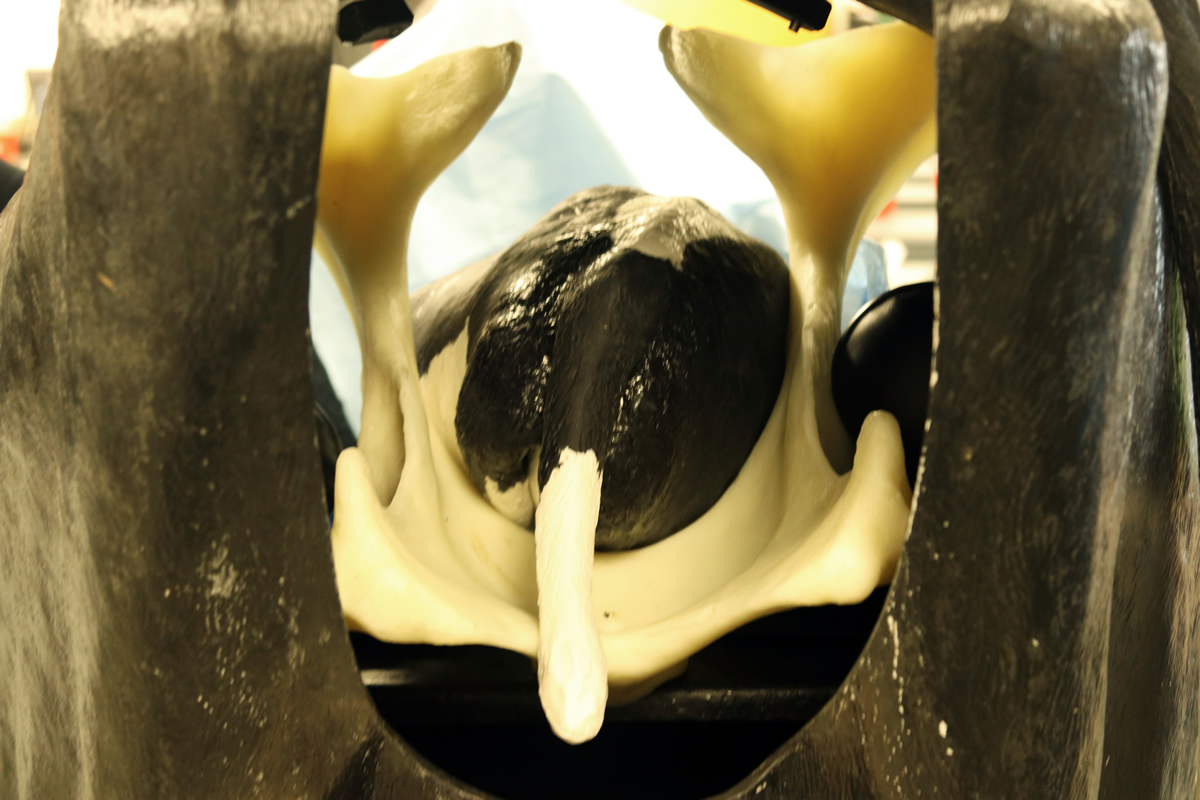
Ventral Deviation of the Head
Ventral
This image shows a ventral
(downward) deviation of the calf's
head. Many calves that present
this way are not likely to result in
a live delivery.
Image credit: Andrew Kingsbury
A ventral (downward) deviation of the head presents similarly to a lateral deviation except that the calf’s head has fallen between its front legs. To correct this abnormal posture the calf will need to be repulsed and the head raised to a normal presentation using techniques just described above for lateral deviations of the head. It is important to determine the viability of the calf before trying to correct the problem. Many calves that are presented with a ventral deviation of the head are already dead. Most live calves will keep their heads on top of their forelegs as they entering the pelvic canal. Once the forelegs are pushed together in the pelvis, it is difficult for the head to fall down between the legs. If the calf is dead, a partial fetotomy may be the best solution.
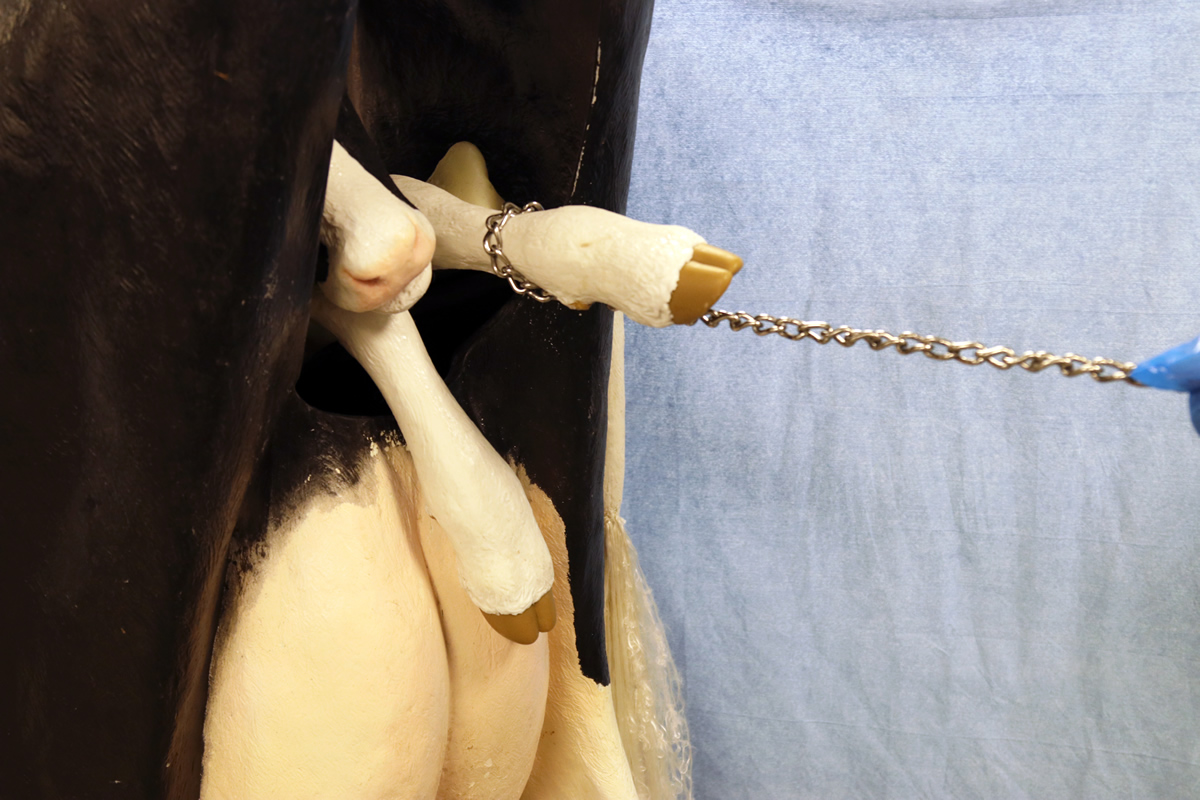
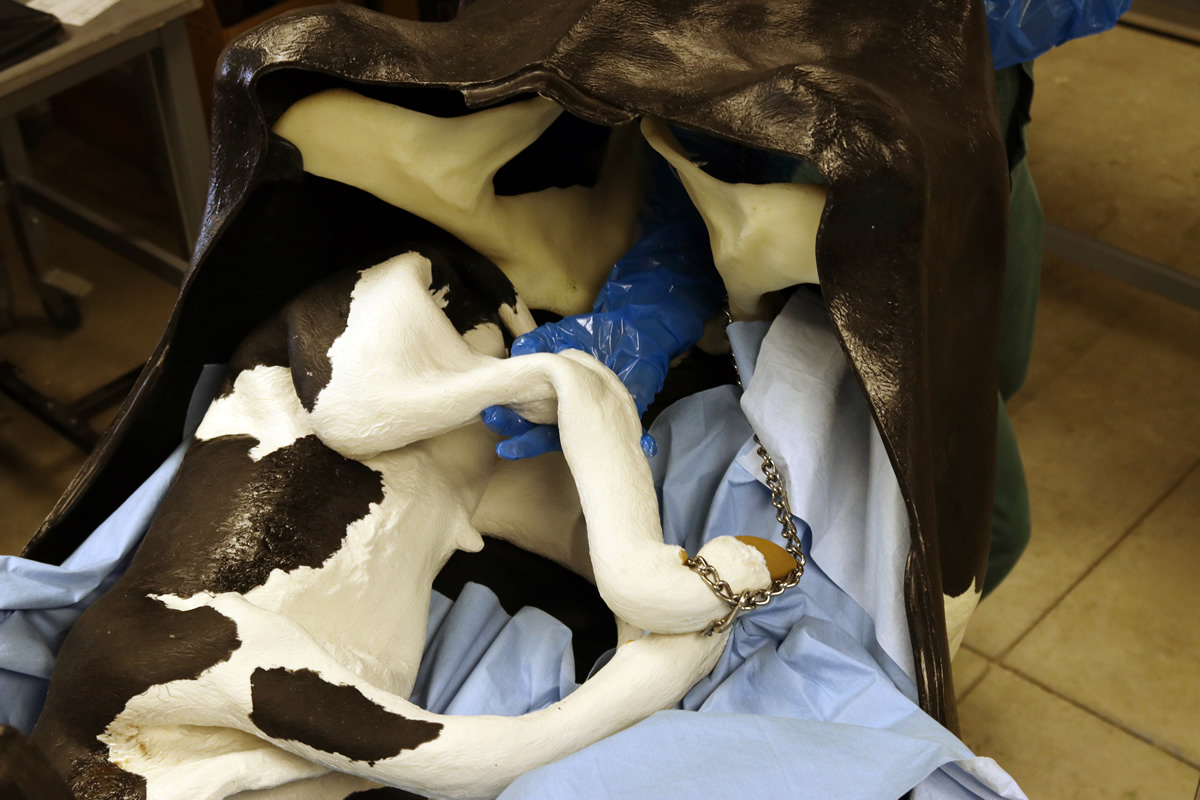
Retention of One or Both Forelimbs

Retention
To manipulate a leg up into the birth
canal, you may need to maneuver
the leg with one hand while pulling
the chain/strap with the other.
Image credit: Andrew Kingsbury
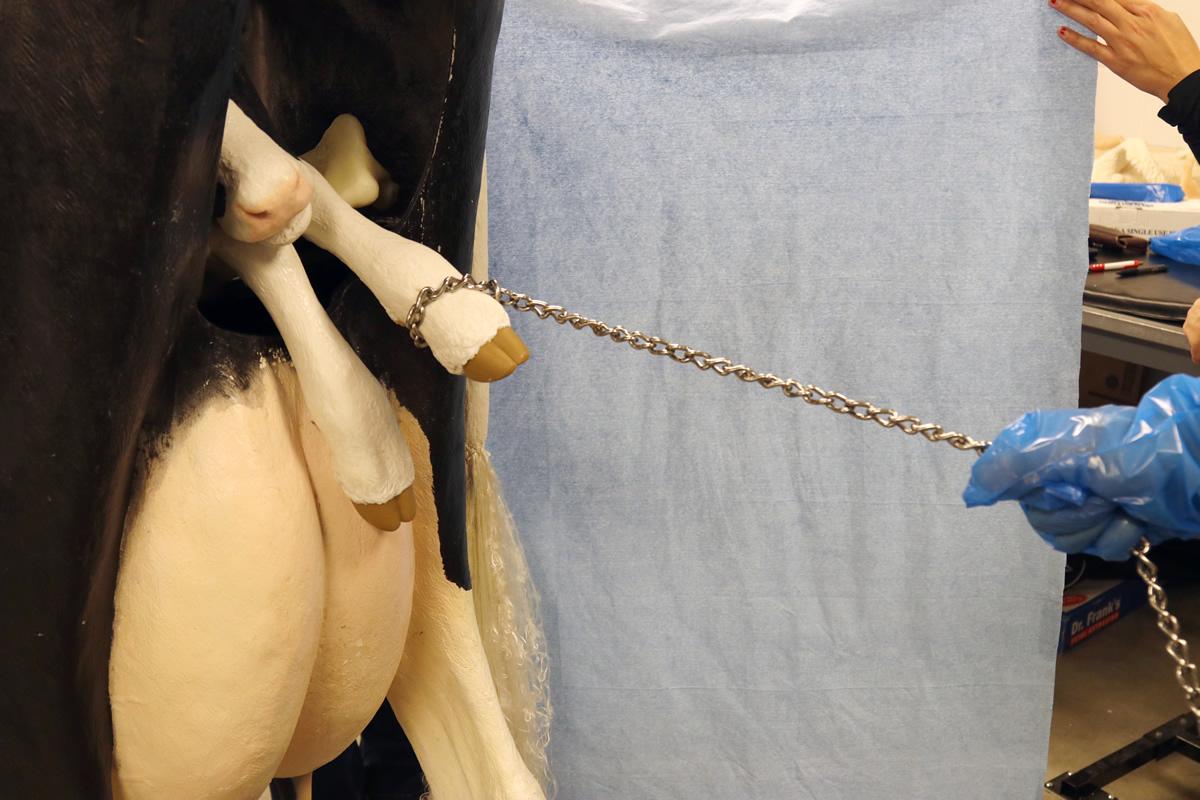
Retention
A chain or strap may be applied to a
retained forelimb to manipulate it to
the birth canal.
Image credit: Andrew Kingsbury
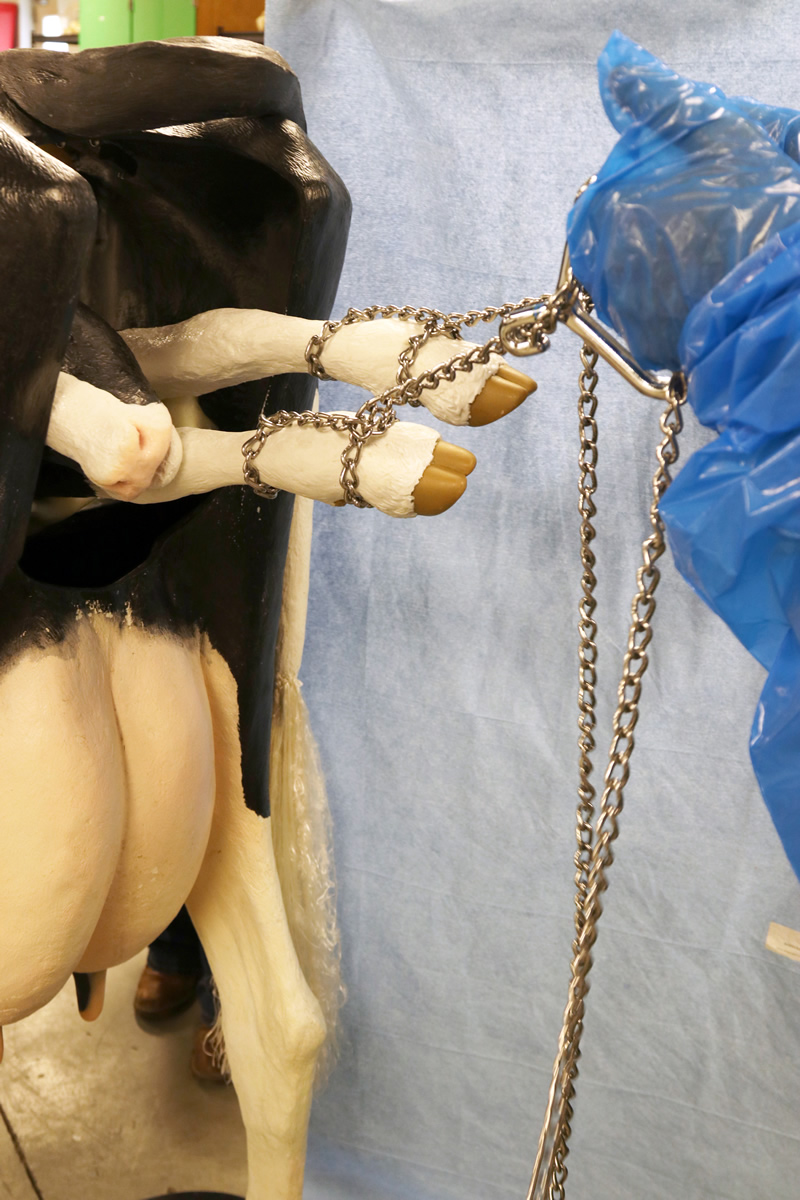
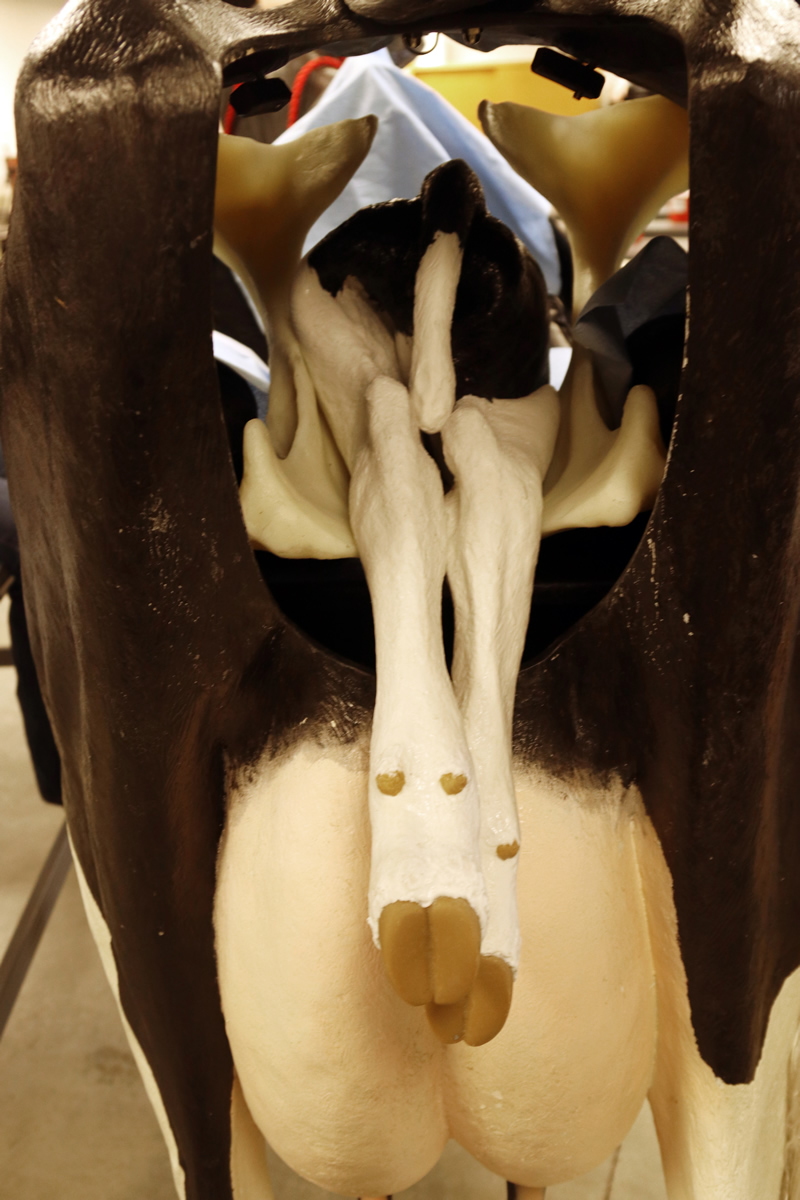
Retention
Overhead view of retention of both
forelimbs.
Image credit: Andrew Kingsbury
Retention
Retention of one forelimb.
Image credit: Andrew Kingsbury
Retention of one or both forelimbs occurs when the head is presented for delivery but one or both forelimbs are retained outside of the birth canal. It is normally easily corrected as long as the uterus has not contracted down to where the calf cannot be repulsed. The first step after determining that the calf is viable is to put a chain around the calf’s poll and through the calf’s mouth and also but a chain on the extended leg if only one leg is back. When you repulse the calf to get the retained leg/legs up you don’t want to lose what you already have. Once a long chain is securely in place and with ample lubrication push the head back into the uterus to give you room to work. In many cases the carpus (knee) is just below the brim of the pelvis. Grasp the carpus and bring up to pelvic canal, then feel down the leg to the foot. Cup the hoof in your hand so it doesn’t tear the uterus. If the calf was able to be repulsed to create room the foot can be lifted up as you rotate the entire leg back. If the cow is straining or uterus is tight push the calf’s carpus back with one hand as you lift up the hoof up with the other.
Posterior Presentation
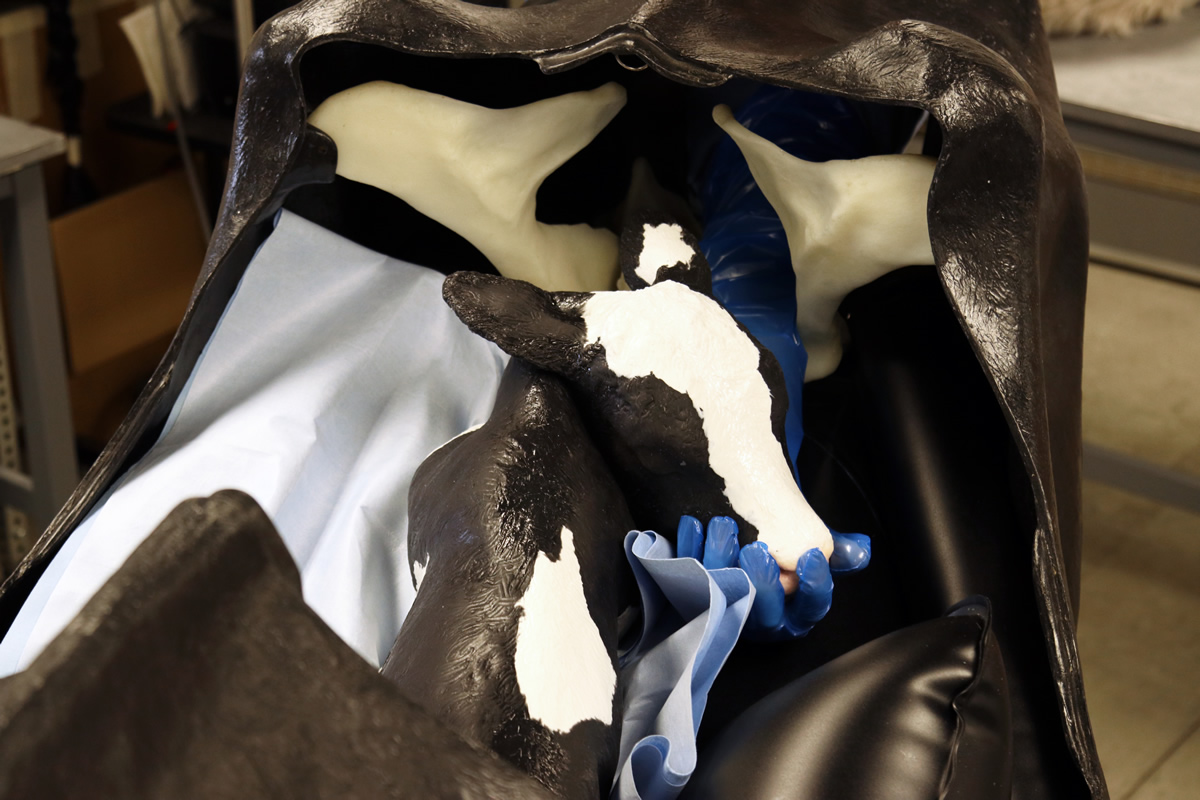
Posterior presentation
A normal backward presentation has
both hind legs presented with the
tail down over/between the legs. A
backwards presentation is normally
recognized because the bottom of
the calf's hoof (sole) is facing up.
Image credit: Andrew Kingsbury
A backwards calf is not necessarily considered an abnormal presentation but can be a cause of dystocia where assistance is required. A normal backward presentation has both hind legs presented with the tail down over/between the legs. A backwards presentation is normally recognized because the bottom of the calf’s hoof (sole) is facing up. When evaluating the calf, confirm that the calf is backwards instead of an upside down calf by differentiating between front leg or back leg. To do this, feel the joints of the leg to identify which way they bend. The fetlock and knee of the front leg bend in the same direction. The fetlock and hock of the back leg bend in the opposite directions. Once you have determined that it is indeed a backward calf, make sure the tail is in position and not bent over the back of the calf. The reason that backwards calves require more assistance than forward-facing calves is that the largest part of the calf (hips) is coming first. To assist delivery of the hips, you may need to rotate the calf to get the hips to slide into the birth canal. Additionally, the soft tissue structures may not have fully dilated so spend a little time manually dilating the vulva to encourage relaxation. The final difficulty with backwards calves is that the umbilical cord will be constricted or torn before the calf’s head is exteriorized to allow breathing. Therefore, once you start pulling a backwards calf you must move fairly rapidly so that the calf can breathe. When using mechanical pulling devices, come along type calf pullers are usually better for backwards calves than ratcheted pole pullers that walk the calf out slowly. When applying chains/straps to hind feet, be sure to use a loop above the fetlock and a half-hitch above the coronary band.
Breech Presentation
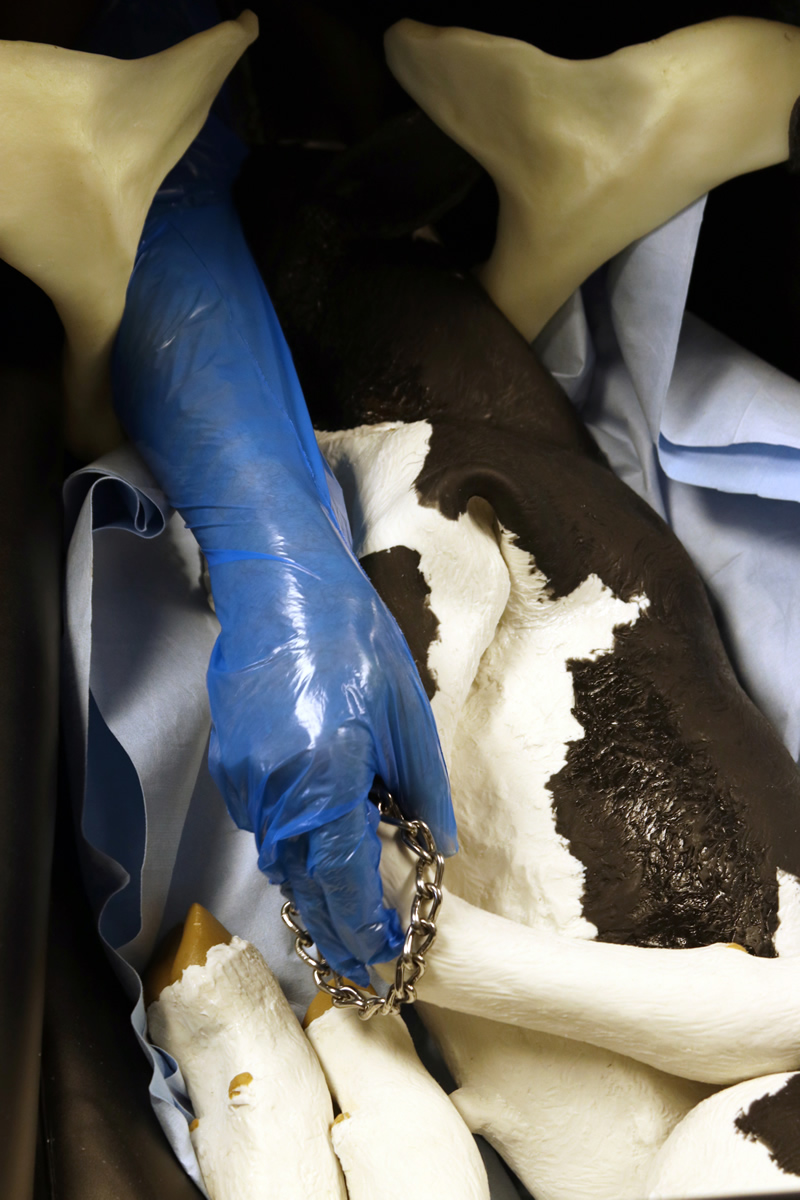
Breech presentation
Take the end of your long chain
around the hock and make a loop
by passing one end through the
other and tighten until it is a loose
loop around the leg. Now slide the
chain down until it slips over the
fetlock and tighten your loop with
the chain coming over the front of
the leg and passing between the
claws. This way when you pull on
the chain, it will curl the foot up so
you are less likely to tear the
uterus. Once the chain is in
place, use one arm to repel the
calf and rotate the leg by pushing
forward on the calf’s hock while
applying traction to the foot with
your chain.
Image credit: Andrew Kingsbury
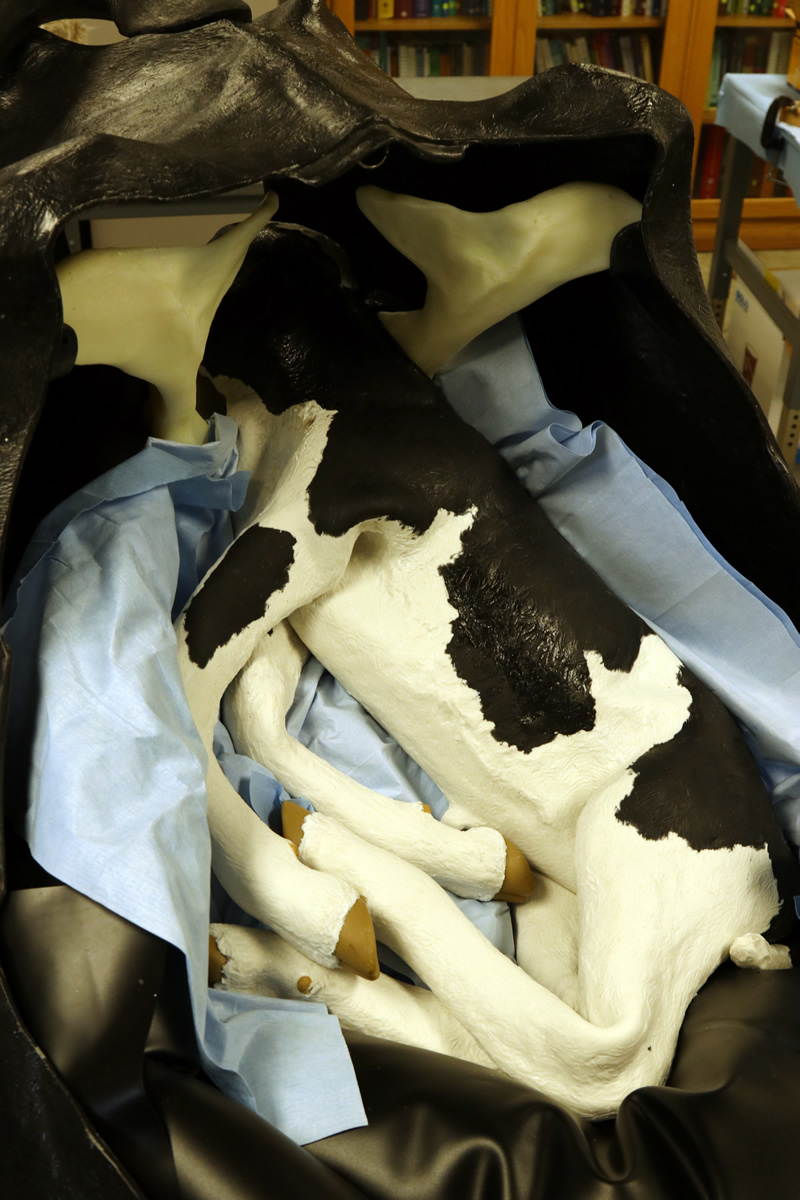
Breech presentation
A breech calf occurs when the calf
is presented backwards with both
hind limbs retained.
Image credit: Andrew Kingsbury
A breech is an abnormal backwards presentation where both hind limbs are retained. Breech presentations are often missed because the cow does not move fully into stage 2 labor since the calf cannot enter the birth canal. For most people, a long chain is useful to help position the hind legs properly.
The first step is to reach up along one side of the calf and grasp the leg at the hock. Pull the hock up so that it is resting on the brim of the pelvis. It may be necessary to repulse the calf in order to move the hock up. Once the hock is in the pelvic canal it should stay there and keep the body of the calf pushed forward.
Next take the end of your long chain around the hock and make a loop by passing one end through the other and tighten until it is a loose loop around the leg. Now slide the chain down until it slips over the fetlock, tighten your loop with the chain coming over the front of the leg and passing between the claws. This way, when you pull on the chain it will curl the foot up so you are less likely to tear the uterus.
Once the chain is in place use one arm to repel the calf and rotate the leg by pushing forward on the calf’s hock while applying traction to the foot with your chain. Go slow and use care so that the hoof does not tear the uterus just below the brim of the pelvis, it is sometimes possible if the cow is not straining hard to cup the hoof with the hand you were pushing with to protect the uterus. Once one leg is positioned properly the second leg can be retracted in a similar manner. Once the breech is corrected, reposition the chains so that you have a loop above and below the fetlock and pull the calf as directed previously for a backwards calf.
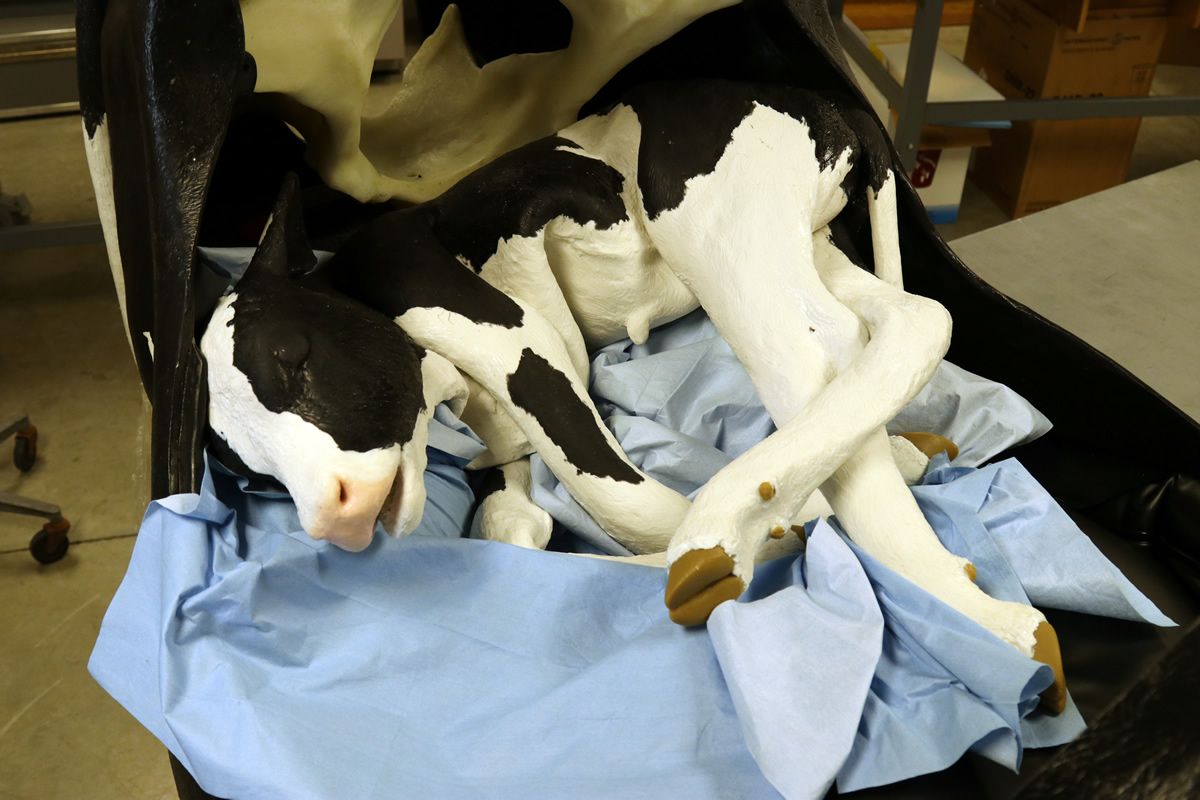
Upside-Down Position
Upside-down position
Upside-down calf.
Image credit: Andrew Kingsbury
Upside-down position
Upside-down calf.
Image credit: Andrew Kingsbury
An upside-down calf needs to be turned right side up before the calf is pulled to avoid injuring the calf. The arc of the pelvic canal can severely damage the calf’s spine if you try to pull it upside down. The calf will need to be repulsed enough for room to pull the calf. Before repulsing the calf put chains on both legs. After repulsing the calf cross the chains/legs so that as you pull it will naturally rotate calf to an upwards position. You can assist the rotation by reaching in with one arm along the side of the calf to help it turn.
Transverse Presentation
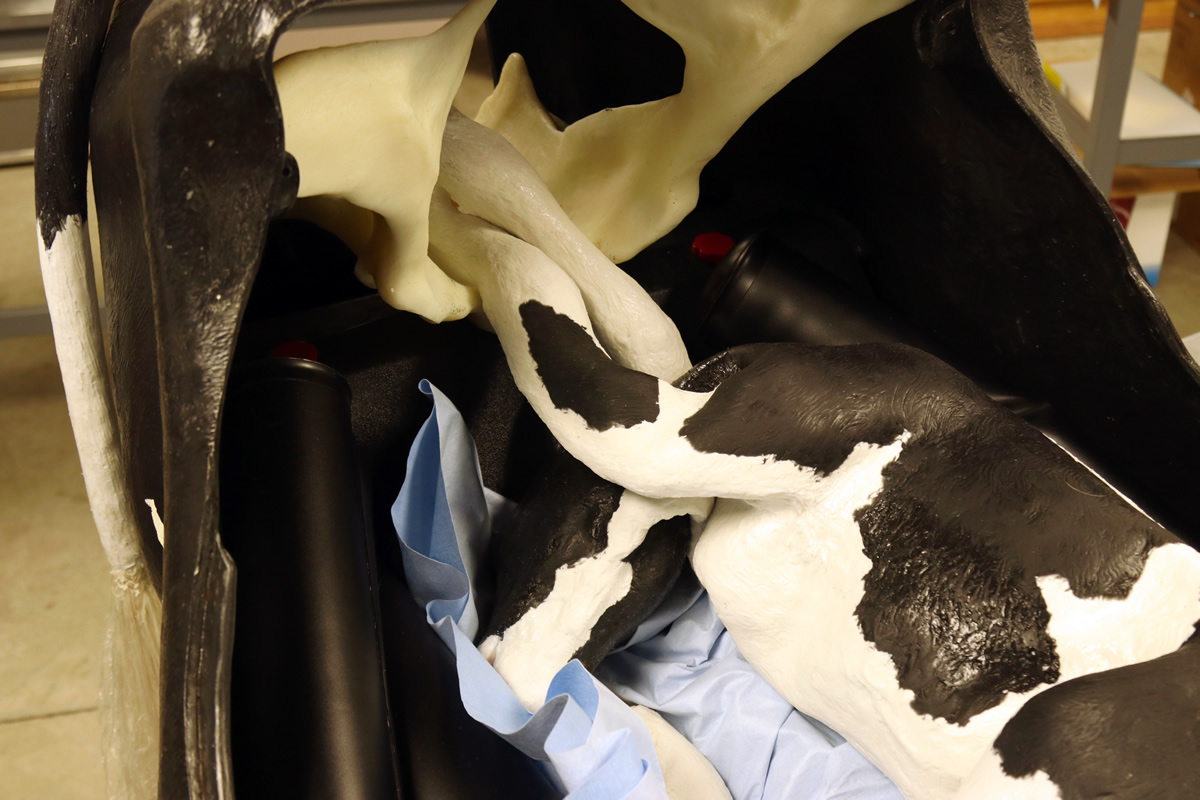
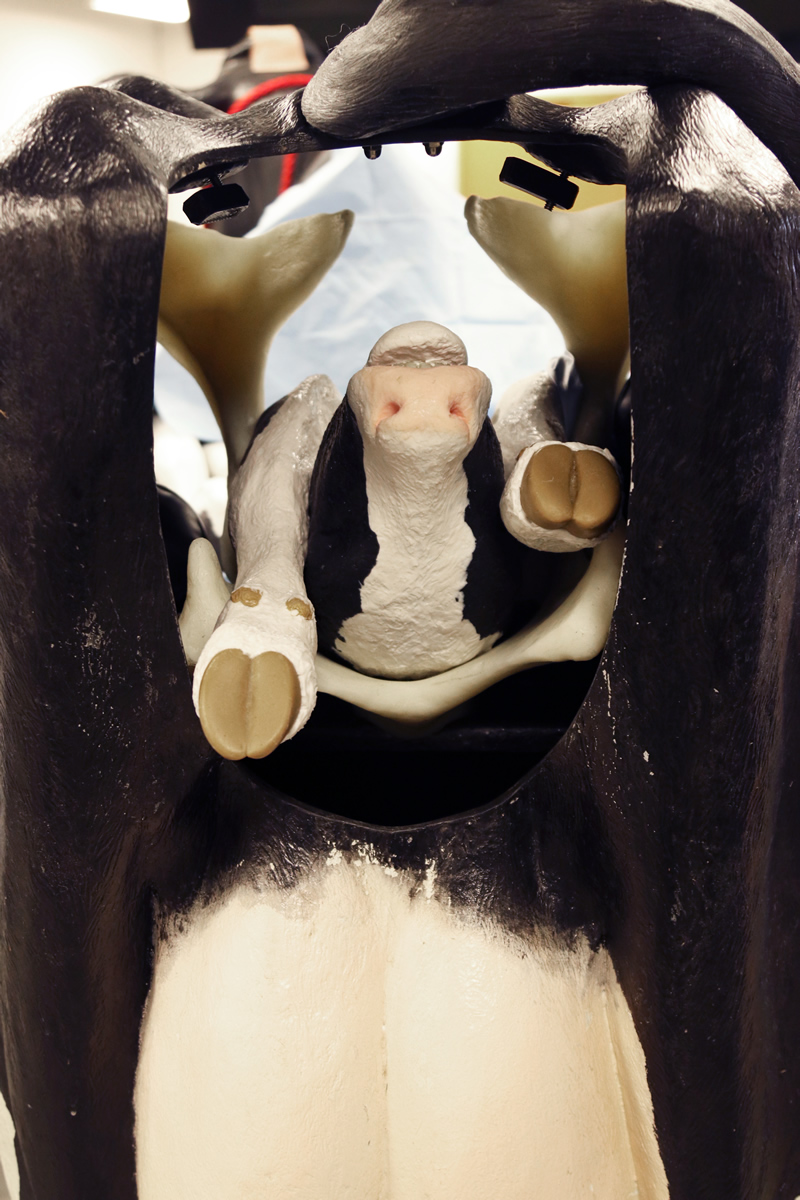
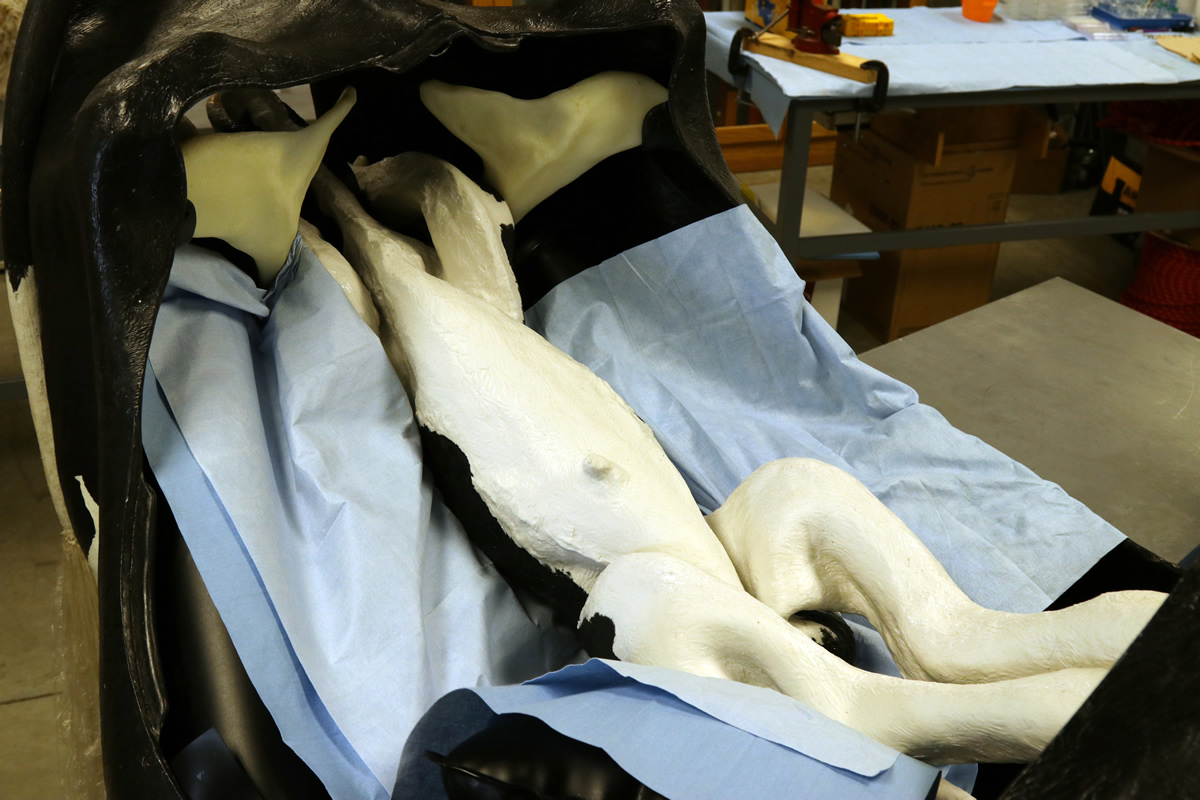
Transverse presentation
Overhead view of a transverse
presentation with four legs being
presented first.
Image credit: Andrew Kingsbury
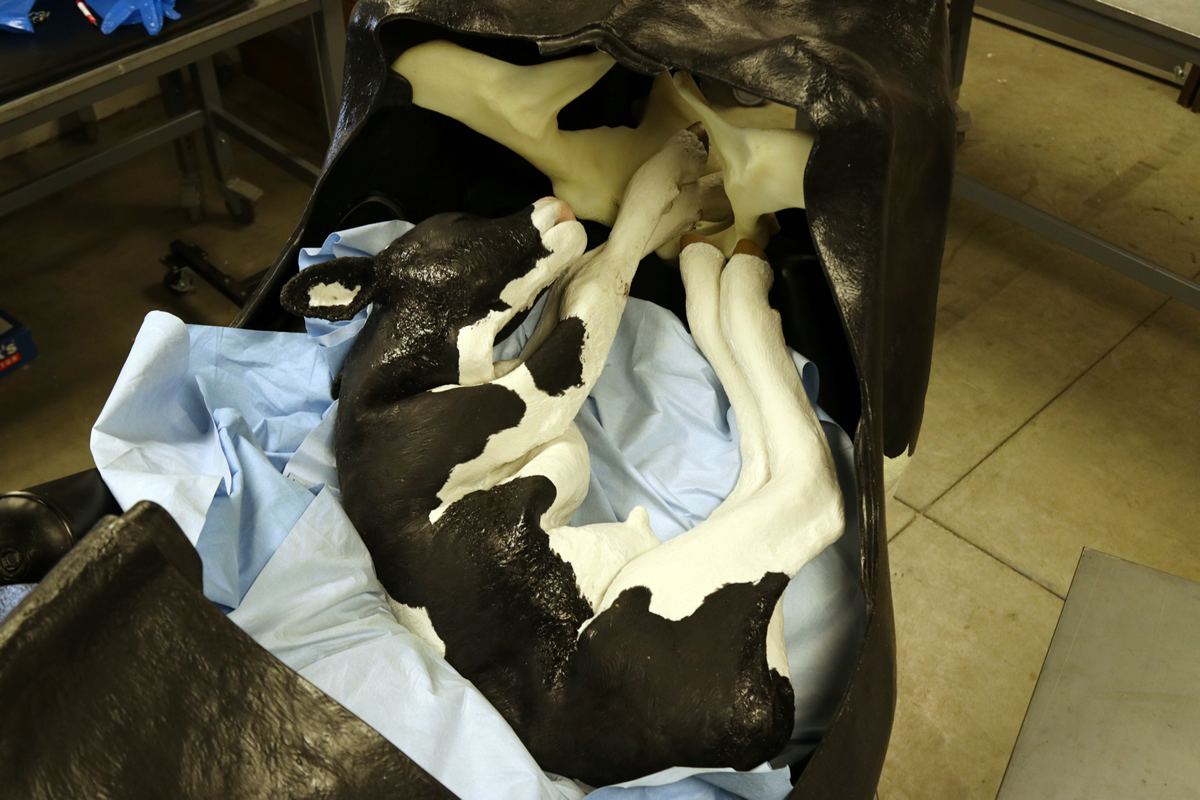
Transverse presentation
Overhead view of a transverse
presentation with the back being
presented first.
Image credit: Andrew Kingsbury
Transverse presentation
All four legs being presented at once.
Image credit: Andrew Kingsbury
Transverse presentations are rare. The calf may present on its side with all four feet in the pelvic opening or with its back to the pelvic opening. If all four feet are being presented, identify the 2 hind legs, apply chains and then repulse the front of the calf enough while pulling the hind legs to turn the calf. Pulling it backwards is easier than trying to get both front legs and the head to come at the same time. Transverse presentations where the back is presented first are extremely difficult to correct and a C-section may be necessary.
Twins
Many times twins can be born on their own since they are usually smaller than single calves. However, if both calves present at the same time they will block the birth canal. Usually, when this happens one calf is being presented in a normal anterior presentation while the other calf is backwards. Identify which legs go together and repulse the calf that is easiest to push back out of the way and then pull the other calf.
Uterine Torsion
A uterine torsion is a calving abnormality that often results in a dead calf on beef cattle farms. A cow’s uterus is relatively unstable compared to many other species, allowing it to rotate. Either movement of the calf or motion of the cow when lying or standing up can flip the uterus 90 degrees or more. This rotation will cause a twist in the uterine body in front of the cervix and prevent the calf from entering the birth canal. Prior to calving, a uterine torsion is not detrimental as the blood supply to the calf is usually not affected. However, once parturition begins the cow will not normally move into stage 2 labor because the fetus is not able to pass into the cervix and birth canal to stimulate stage 2 labor. Cows with a uterine torsion are often missed since the cow never reaches stage 2 labor. Typically, a history of “it looked like she was going to calve yesterday or the day before” is common with a uterine torsion. During stage 1, the cow may appear restless and isolate herself from the herd, but after 6-12 hours (and not moving into stage 2 labor) she will often rejoin the herd and appear normal. After 24-48 hours, the placenta will have separated from the uterine wall after the calf died and may be visible. A uterine torsion is diagnosed by feeling the spiral rotation of the uterus through a vaginal exam.
In most cases a uterine torsion can be corrected with veterinary intervention. In rare cases, a C-section is needed if the uterus torsion cannot be manually corrected. However, C-sections on dead calves are not optimal as the cow’s abdomen can be contaminated with decomposing or infected fetal fluids and result in peritonitis.
| Contributors | |||||
|---|---|---|---|---|---|
| Grant Dewell | Renée Dewell | Katy Lippolis | |||
Associate Professor |
Veterinary Specialist Center for Food Security/Public Health rdewell@iastate.edu 970-231-9654 |
||||